You’ve prepared an invoice in QuickBooks Desktop, reviewed the details, and clicked Send, but the email fails to go through. You try again, only to encounter the same error. The next question is simple: What is blocking the flow of QuickBooks from sending the email?
You may have an incorrect email setup, authentication problem, unstable Internet connection, or a problem with your firewall or antivirus software. The issue could also be linked to the way your email account is configured with QuickBooks if you use Gmail, Yahoo Mail, or Microsoft Outlook.
We will review the various issues that QuickBooks may experience when attempting to send email, and then individually discuss how to troubleshoot each issue.
Why Is QuickBooks Unable to Send Emails?
QuickBooks can have issues sending emails for a number of reasons. If you can determine the cause, you can select the correct solution rather than trying a variety of fixes.
| Potential Error / Issue | Possible Cause | Solution |
| Couldn’t Connect to Email Server | Incorrect email settings or connection issues | Verify SMTP Server and Port Settings |
| QuickBooks Was Unable to Send Your Form | Incorrect webmail settings | Verify Your Webmail Settings |
| Incorrect Email Address or Password | Invalid login credentials | Check Email Password and Authentication |
| Antivirus Blocking Outgoing Emails | Antivirus restrictions | Check Firewall and Antivirus Settings |
| Gmail Authentication Error | Authentication issues | Check Email Password and Authentication |
| Yahoo Mail Authentication Error | Incorrect credentials or security settings | Check Email Password and Authentication |
| Incorrect SMTP Server or Port Settings | Incorrect outgoing mail server configuration | Verify SMTP Server and Port Settings |
| Email Issues After a QuickBooks Update | Outdated QuickBooks software | Update QuickBooks Desktop |
| Firewall Blocking Email Connections | Firewall restrictions | Check Firewall and Antivirus Settings |
| Invoice or Document Fails to Send | Document-specific issue | Try Sending a Different Invoice or Document |
After gaining a clearer understanding of what is causing the issue, you can go through the solutions below.
How to Fix QuickBooks When It Cannot Send Email
Once you’ve identified the error, work through the following solutions one at a time.
Check Your Internet Connection
It might sound obvious, but your internet connection is a good place to start. QuickBooks needs to communicate with your email provider, and an interrupted or unstable connection can prevent the message from being sent.
If QuickBooks is unable to send emails due to network connection failure, check whether the problem affects other online services or is limited to QuickBooks Desktop.
You can do the following:
- Open your web browser and visit a website you normally use.
- Check whether other online services are working properly.
- If the connection is unstable, reconnect to your network or restart your router if necessary.
- Return to QuickBooks Desktop and try sending the email again.
If your message is not being sent even if all other steps are completed normally, then proceed to the next step.
Update QuickBooks Desktop
Sometimes an older version of QuickBooks will add to software or compatibility issues. If the problem with email began recently, then it’s beneficial to install available updates.
To check for updates:
- Open QuickBooks Desktop.
- Select Help from the top menu.
- Choose Update QuickBooks Desktop.

- Open the Update Now tab.
- Select Get Updates.
- Once the update has downloaded, restart QuickBooks and install it if prompted.
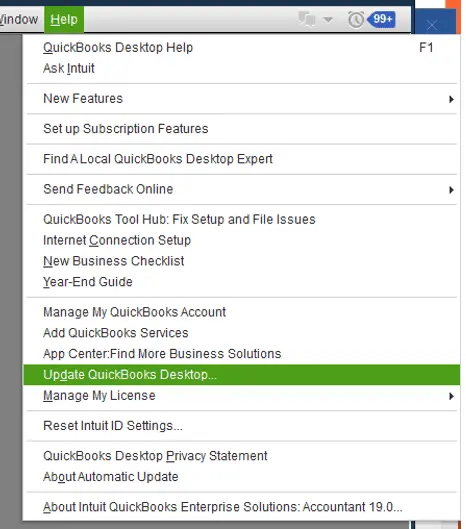
After the update, try sending an invoice or another document.
Keep in mind that updating QuickBooks may help with software-related issues, but it won’t automatically correct an incorrect email password or server configuration.
Verify Your Webmail Settings
If you’re using Gmail, Yahoo Mail, or another supported webmail account, incorrect configuration may be preventing QuickBooks from sending messages.
It’s worth checking the account settings before making more advanced changes.
Follow these steps:
- Open QuickBooks Desktop.
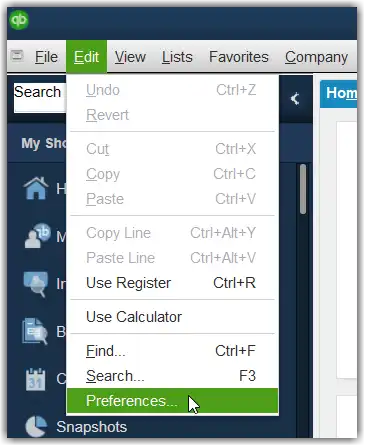
- Select Edit.
- Choose Preferences.
- Select Send Forms.
- Review the email options and select your webmail account.
- Check the available account settings and make sure they match your provider’s requirements.
- Save any necessary changes and try sending the email again.
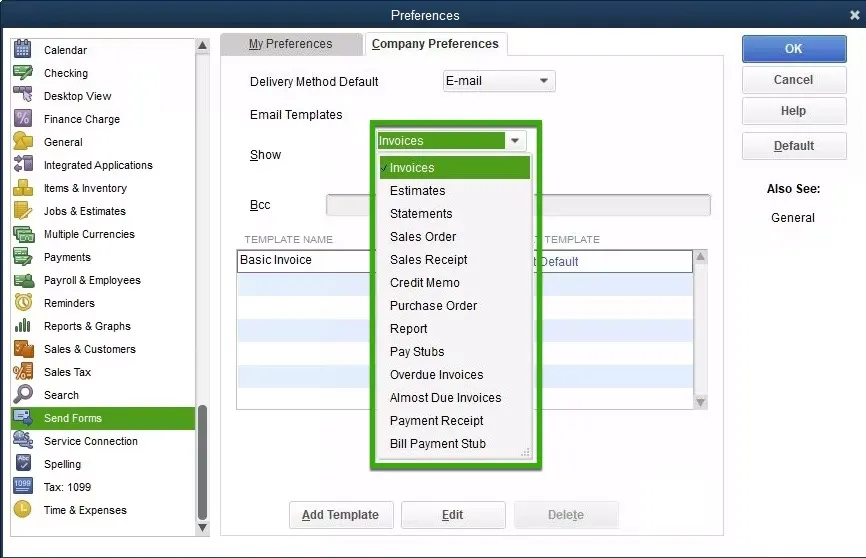
The available options can differ depending on your QuickBooks version and email provider.
Check Gmail Authentication Settings
Gmail authentication issues can prevent QuickBooks Desktop from connecting to your Google account. These problems may occur after a password change, a security update, or a change in the authentication methods supported by your email application.
To troubleshoot Gmail email errors:
- Sign in to your Google Account.
- Review your account’s security settings and check for security alerts or sign-in verification requests.
- Confirm that your QuickBooks version supports the authentication method required by your Google account.
- If your account and application support app passwords, follow Google’s official app password instructions to generate one.
- Return to QuickBooks Desktop and open Edit > Preferences > Send Forms.
- Review your Gmail account settings and update the authentication details if your configuration supports doing so.
- Send yourself a test invoice or transaction.
Next, we will cover Yahoo Mail.
Check Yahoo Mail Authentication Settings
Yahoo Mail may require an app-specific password when a third-party desktop application connects to your account. Your regular Yahoo password may not work with every email configuration.
Follow these steps:
- Sign in to your Yahoo Account Security page.
- Review your account’s security settings.
- If Yahoo requires an app password for your configuration, follow its official third-party app password instructions.
- Open QuickBooks Desktop and navigate to Edit > Preferences > Send Forms.
- Review your Yahoo Mail settings and enter the app password if the configured connection requires it.
- Save your changes and send yourself a test transaction.
If you send invoices in batches, check Yahoo’s current app-password and usage requirements if sending stops partway through the process.
Facing trouble with your Outlook account? Look no further, we got you!
Verify Your Outlook Configuration
The error QuickBooks Desktop is unable to send your emails to Outlook may occur when Outlook is not configured correctly, the selected email profile has a problem, or QuickBooks cannot communicate with the Outlook desktop application.
Start by confirming that Outlook works independently of QuickBooks.
- Open Microsoft Outlook.
- Confirm that your intended email account is configured correctly.
- Send a test email directly from Outlook.
- Check whether the message appears in the recipient’s inbox.
- If Outlook cannot send the message, resolve that issue in Outlook before troubleshooting QuickBooks.
- Once Outlook works normally, reopen QuickBooks Desktop and try sending a transaction again.
With Outlook working independently, the next step is to examine your email account’s authentication settings and confirm that QuickBooks can access it.
Check Your Email Password and Authentication
Sometimes, the problem isn’t QuickBooks itself. Your email provider may be rejecting the sign-in method used by the software.
This can happen after you change your password, enable additional account security, or encounter a change in your provider’s authentication requirements.
To investigate:
- Open your email provider’s official website.
- Confirm that you can sign in successfully.
- Check for security alerts or messages requesting additional verification.
- Review the provider’s current requirements for applications that access your email account.
- If an app password or another supported authentication method is required, follow the provider’s official instructions.
- Update the relevant settings in QuickBooks if your account and QuickBooks version support the required method.
With authentication verified, turn your attention to the outgoing mail server settings to ensure QuickBooks uses the correct SMTP server and port.
Verify SMTP Server and Port Settings
If your email account requires manual configuration, incorrect SMTP settings may prevent QuickBooks from connecting to the outgoing mail server.
SMTP stands for Simple Mail Transfer Protocol. It’s the standard protocol used to send outgoing email, and the correct server details depend on your email provider.
Check these settings:
- SMTP server: Confirm the outgoing mail server address.
- Port number: Verify the port required by your provider.
- Encryption: Check whether the provider requires SSL or TLS.
- Authentication: Confirm the supported sign-in method for outgoing mail.
Note: Don’t copy SMTP settings from an unrelated email service or assume that every provider uses the same port.
Correct SMTP settings help establish the email connection. Next, review your firewall and antivirus settings for rules that might block QuickBooks.
Check Your Firewall and Antivirus Settings
Security software is designed to protect your computer, but it can sometimes block a legitimate application or connection. If your antivirus software or firewall is preventing QuickBooks from communicating with the email server, the email may fail to send.
Here’s how to investigate:
- Check whether your antivirus software has recorded a blocked connection involving QuickBooks.
- Review your firewall rules and application permissions.
- If QuickBooks has been incorrectly blocked, follow the security vendor’s instructions for allowing the legitimate application or connection.
- Restart QuickBooks and test the email function again.
Note: Avoid disabling your firewall or antivirus permanently.
Once you’ve reviewed your security settings, test a different invoice or document to determine whether the sending issue affects all transactions or a specific one.
Try Sending a Different Invoice or Document
What if you’ve checked your connection and email settings, but one particular invoice still refuses to send?
Before changing more settings, try sending another invoice, statement, or report.
This simple test can help you narrow down the problem.
- If every document fails: Focus on your email configuration, authentication, connection, and security software.
- If only one document fails: Check the recipient’s email address and investigate whether the problem is limited to that transaction or document.
This test won’t identify the cause by itself, but it can help you decide which troubleshooting steps to try next.
What If QuickBooks Still Cannot Send Email?
If you’ve worked through these steps and the problem persists, don’t worry about repeating the same fixes.
Make a note of:
- Your QuickBooks Desktop version and release.
- The exact error message or error code.
- The email provider you’re using.
- Whether all emails fail or only certain documents.
- Any recent changes to your password, account security, network, or computer.
Keeping these details ready will help the Accounts Confidant team better understand the issue and guide you toward a solution that fits your QuickBooks version and email configuration.
Conclusion
QuickBooks email errors can result from incorrect Outlook settings, authentication problems, SMTP configuration, or security restrictions. Identifying the underlying cause is essential to restoring email functionality. Review each setting carefully and note any error messages to help narrow down the issue and prevent recurring email interruptions.
FAQ’s
Does QuickBooks support Gmail for sending invoices?
Yes, QuickBooks Desktop can be configured to send forms through supported webmail services, including Gmail, depending on the product version and current email configuration requirements. You may need to enter the appropriate email settings and complete the required authentication steps.
Why did QuickBooks email stop working after a Windows update?
A Windows or Microsoft Office update can change email, application, or security settings that QuickBooks relies on. Check your Outlook configuration, QuickBooks email preferences, and application updates. If the issue started immediately after an update, installing the latest available updates may resolve compatibility problems.
How do I reconnect my email account in QuickBooks?
Open Edit > Preferences > Send Forms in QuickBooks Desktop and select your email service under My Preferences. If you use webmail, edit the account and verify the email address, server, port, and other required settings before testing the connection again.
What’s the difference between QuickBooks Webmail and Outlook integration?
With Outlook integration, QuickBooks uses Microsoft Outlook to send your forms and transactions. With Webmail, QuickBooks connects directly to your supported email account using its webmail or SMTP configuration.
Why do my customers say they never received my QuickBooks invoice email?
First, confirm that QuickBooks successfully sent the invoice and verify the customer’s email address. Ask the customer to check their spam or junk folder. If the invoice is not being sent successfully, review your QuickBooks email preferences and email account configuration.
Accounts Confidant is an independent accounting and bookkeeping service provider and is not affiliated with Intuit.