Your bank statement shows $12,500, but QuickBooks shows $12,100. The difference might come from a missing deposit, a duplicate payment, or a check that has not cleared the bank.
QuickBooks bank reconciliation helps you find out why the balances differ. You compare the transactions in QuickBooks with your bank statement and mark the ones that have cleared. When the correct transactions match, the reconciliation difference should be $0.00.
You can reconcile bank and credit card accounts in both QuickBooks Online and Desktop. This guide covers the steps for each version, common balance problems, and how to check your results.
What Is Bank Reconciliation in QuickBooks?
Bank reconciliation in QuickBooks means checking your recorded payments and deposits against your bank or credit card statement.
For example, your bank statement shows a $35 monthly service fee, but QuickBooks has no record of it. You need to confirm the charge and record it in QuickBooks before you can match the statement.
The process helps you find missing payments, duplicate deposits, incorrect amounts, and other record errors.
There is one important difference to understand:
- Bank feed matching checks whether a downloaded transaction matches a record in QuickBooks.
- Bank reconciliation checks whether the cleared transactions in QuickBooks agree with your bank statement for a set period.
A connected bank account does not mean your books are fully reconciled. You still need to review the statement.
What Do You Need Before Reconciling in QuickBooks?
Before starting, get your bank statement and make sure your QuickBooks records are up to date.
You will need:
- Bank statement: Use the statement for the month you want to reconcile.
- Beginning balance: Check the opening amount shown on the statement against the balance carried forward in QuickBooks.
- Ending balance: Find the closing balance printed on the statement.
- Statement ending date: Note the last day covered by the statement.
- Recorded transactions: Make sure payments, deposits, fees, and transfers are entered in the correct QuickBooks account.
If your bank account is connected to QuickBooks Online, review the downloaded transactions first.
Go to All apps → Accounting → Bank transactions.
Match downloaded transactions to records that already exist. If a transaction has not been recorded, review it and add it to the correct account.
For example, suppose you entered a $600 supplier payment in QuickBooks. When the same payment appears in your bank feed, match it to the existing payment. Do not add a second expense.
Keep invoices, receipts, and payment records available in case an amount needs checking. These source documents in bookkeeping can help you confirm what a payment was for.
If you use QuickBooks Desktop, create a backup of your company file before starting.
How to Reconcile a Bank Account in QuickBooks Online
To reconcile a bank account in QuickBooks Online, open the Reconcile tool, choose the account, enter the statement details, and check the cleared transactions.
The following steps use Intuit’s classic reconciliation workflow.
Step 1: Open the reconciliation tool
- Sign in to QuickBooks Online.
- Go to All apps → Accounting → Reconcile.
- Select Reconcile.
- If this is your first reconciliation, select Get started.
Some QuickBooks layouts also show the Reconcile option under Settings. If you cannot find it, use the search bar inside QuickBooks.
Step 2: Choose the correct bank account
From the Account dropdown, select the checking or savings account you want to reconcile.
If you have several accounts with the same bank, check that you selected the right one.
Review the last statement ending date shown in QuickBooks. Your next statement should cover the period after that date.
For example, if your last reconciliation ended on August 31, the next statement would normally begin on September 1.
Step 3: Enter the statement details
Enter the following information from your bank statement:
- Ending balance
- Ending date
Suppose your September bank statement shows:
| Statement detail | Value |
| Statement period | September 1–30 |
| Beginning balance | $6,200 |
| Ending balance | $8,450 |
| Ending date | September 30 |
Enter $8,450 as the ending balance and September 30 as the ending date.
Check the beginning balance shown in QuickBooks. It should match the balance brought forward from the prior statement.
Select Start reconciling.
If QuickBooks warns that the beginning balance is wrong, resolve that issue before continuing.
Step 4: Match transactions with the bank statement
QuickBooks displays the transactions recorded in the selected account.
Start with the first transaction on your bank statement. Find the same transaction in QuickBooks.
Compare the amount, date, and transaction details.
If they match, select the checkbox beside the QuickBooks transaction.
Continue with each payment, deposit, and bank charge on the statement.
Leave transactions unchecked if they have not cleared the bank.
For example, suppose you issued a $250 check on September 28. QuickBooks records the check, but it does not appear on your September bank statement.
Do not check it during September’s reconciliation. It should remain outstanding until the bank processes it.
Some transactions may already be checked because QuickBooks matched them through your connected bank account. Review those items before finishing.
Step 5: Review the reconciliation difference
QuickBooks updates the reconciliation difference as you mark transactions.
Your target is:
Reconciliation difference = $0.00
If the difference is not zero, review the statement details and selected transactions.
For example, a $35 difference might be caused by a bank service fee that was not entered in QuickBooks.
You can select Edit info to check the ending balance and date.
If those details are correct, look for missing payments, duplicate deposits, incorrect amounts, or transactions checked in the wrong period.
Do not accept a difference simply to finish the reconciliation.
Step 6: Finish and save the reconciliation
When the difference reaches $0.00 and the selected transactions are correct:
- Select Finish now.
- Select Done.
QuickBooks saves the reconciliation and creates a report.
You can review past reconciliations through History by account.
For the current workflow, refer to Intuit’s official QuickBooks Online reconciliation guide.
What if QuickBooks Online uses AI-powered reconciliation?
QuickBooks Online also has an AI-powered reconciliation feature for eligible plans.
Intuit documents this feature for QuickBooks Online Plus, Advanced, and Intuit Enterprise Suite.
Instead of entering all statement details yourself, you can upload a bank statement or use Statement Auto Import when available.
To use this workflow:
- Open the Reconcile tool.
- Choose the bank account.
- Upload your bank statement or select an imported statement.
- Review the ending balance and date extracted by QuickBooks.
- Select Start reconciling.
- Review the results shown in the Insights tab.
QuickBooks may identify matched transactions, bank feed items that need review, and extra entries that do not appear on the statement.
Check these results against your bank records. A suggested match still needs to be correct before you accept it.
If you do not see the upload option, use the classic reconciliation steps for your account.
How to Reconcile a Bank Account in QuickBooks Desktop
QuickBooks Desktop uses the Banking menu to start a reconciliation. The software lists payments and deposits so you can compare them with your statement.
Step 1: Open the Reconcile window
- Open QuickBooks Desktop.
- Select Banking → Reconcile.

- Choose the bank account from the Account dropdown.
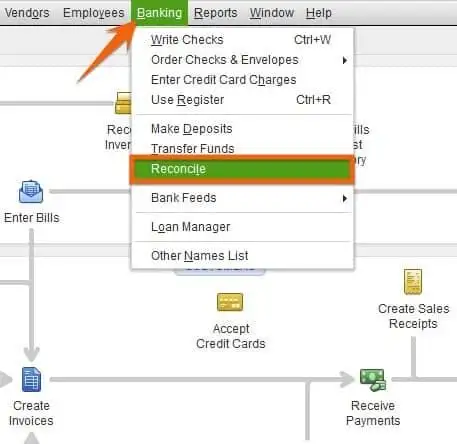
Before you continue, make sure you have a current backup of your company file.
Step 2: Check the statement details
QuickBooks Desktop displays several fields:
| Field | What to check |
| Statement Date | Last date covered by your bank statement |
| Beginning Balance | Balance carried forward from the previous reconciliation |
| Ending Balance | Closing balance on your current bank statement |
| Service Charge | Bank fees not yet recorded |
| Interest Earned | Bank interest not yet recorded |
QuickBooks fills in the beginning balance using the previous reconciliation.
Check it against the bank statement before moving forward.
Enter any service charges or interest only if they have not already been recorded. Adding them again can create duplicates.
Select Continue.
Step 3: Match the payments and deposits
The Reconcile window displays the account transactions.
For bank accounts, payments and deposits appear in separate sections.
Compare each transaction with your bank statement. Mark the ones that have cleared.
You can select Hide transactions after the statement’s end date to focus on the correct period.
If you need to inspect a transaction, select it and click Go To, or double-click the entry.
Check the payment amount and account details before making changes.
If a transaction does not appear on your statement, leave it unchecked.
Step 4: Check the difference and finish
After reviewing all statement transactions, check the Difference field.
If it shows $0.00, select Reconcile now.
If it does not, check the selected payments, deposits, and statement details.
Use Modify to review information entered at the start, such as the ending balance or service charges.
If you cannot find the error, choose Leave Reconcile to save your work. You can return after checking the records.
Avoid using Enter Adjustment to force the account to balance. This creates a journal entry rather than correcting the original error.
Once the difference is zero and the transactions are correct, finish the reconciliation and review the report.
For more details, see Intuit’s QuickBooks Desktop reconciliation instructions.
How Do You Fix QuickBooks Bank Reconciliation Differences?
The right fix depends on when and where the difference appears.
First, identify which of these three situations matches your problem.
| What you see | Likely cause | First action |
| Beginning balance does not match | Incorrect opening balance or changes to past transactions | Review the opening balance or discrepancy report |
| Beginning balance is correct, but the reconciliation difference is not zero | Missing, duplicate, or incorrect transactions | Check the statement details and transaction list |
| Reconciliation difference is zero, but the bank and QuickBooks balances differ | Outstanding checks or deposits | Review transactions that have not cleared |
1. The beginning balance is wrong during your first reconciliation
If you have never reconciled the account, start by checking its opening balance.
The opening balance is the amount recorded when you began tracking the bank account in QuickBooks.
For example, suppose you started using QuickBooks on January 1. Your bank had $12,000 at the start of that day.
Your opening balance should reflect the bank balance at that same point in time, with no older transactions counted twice.
To review it in QuickBooks Online:
- Go to All apps → Accounting → Chart of accounts.
- Find the bank account.
- Select View register.
- Find the opening balance entry.
- Check its date and amount against your bank records.
The opening balance entry normally uses the Opening Balance Equity account.
If the values differ, check whether someone entered transactions dated before the account’s start date.
Do not change the opening balance until you know why it is wrong. An incorrect correction can affect all later reconciliations.
If this is your first reconciliation, follow Intuit’s opening balance troubleshooting guide.
2. The beginning balance changed after an earlier reconciliation
If you have reconciled the account before, the next beginning balance should match the ending balance from your last completed reconciliation.
A difference may appear when an old transaction has been changed.
For example, you reconciled a $750 supplier payment in August. Someone later edited that payment to $570.
The $180 change can affect the beginning balance of the next reconciliation.
Other causes include deleted payments, voided checks, transactions moved to another account, or changes to their reconciliation status.
In QuickBooks Online:
- Open All apps → Accounting → Reconcile.
- Select the affected account.
- Look for the beginning balance warning.
- Select We can help you fix it to open the Reconcile Discrepancy Report.
- Review the transactions listed in the report.
The report shows what changed and how those changes affect the balance. You can also review transaction history or the Audit log for more details.
Check the original records before reversing an entry. A change may have been made for a valid accounting reason.
In QuickBooks Desktop, use Locate Discrepancies from the reconciliation setup window to review possible changes.
3. The reconciliation difference is not zero
If the beginning balance is correct, check the current statement details and transactions.
Start with the ending balance and date. A typing error here can cause a difference even when all transactions are recorded correctly.
Next, look for missing payments and deposits.
Suppose your bank statement shows a $42 service fee that is not in QuickBooks. Record the fee in the right account, then review it during reconciliation.
If a transaction appears twice in QuickBooks, check whether it was entered manually and then added again from the bank feed.
Do not delete either entry until you confirm which one is correct.
For a wrong amount, compare the QuickBooks entry with the bank statement and its supporting record. Correct the actual error, then return to the reconciliation.
If the difference remains, follow Intuit’s guide to fixing reconciliation differences.
4. Several customer payments appear as one bank deposit
Your bank may combine several payments into a single deposit.
For example:
- Customer A pays $250.
- Customer B pays $300.
- Customer C pays $350.
Your bank statement shows one $900 deposit.
In QuickBooks, the three customer payments may need to be grouped into one bank deposit.
QuickBooks Online uses Undeposited Funds, an account that holds payments before they are added to a bank deposit.
Check whether the payments were placed there. If they were, use the Bank Deposit feature to group them into the $900 amount shown by the bank.
If the funds were already deposited in QuickBooks, review the existing deposit before creating another one.
This helps avoid recording the same money twice.
5. The reconciliation difference is zero, but the QuickBooks balance still differs
A zero reconciliation difference does not mean the current book balance must equal the bank statement ending balance.
The difference may be caused by checks or deposits that have not yet cleared.
These are often called outstanding transactions.
An outstanding check has been recorded in QuickBooks but has not yet been processed by the bank.
A deposit in transit has been recorded in QuickBooks but has not yet appeared on the statement.
Both can explain why the balances differ after a correct reconciliation.
QuickBooks Bank Reconciliation Example: Why Two Balances Can Differ
Suppose a small business has the following bank activity for September.
| Transaction | Amount |
| Beginning bank balance | $10,000 |
| Deposits cleared | +$4,000 |
| Payments cleared | −$2,500 |
| Bank service fee | −$25 |
| Bank statement ending balance | $11,475 |
The business also issued a $400 check on September 29.
That check was recorded in QuickBooks, but the bank did not process it before September 30.
The balances are:
Bank statement balance: $11,475
QuickBooks book balance: $11,075
Outstanding check: $400
The difference between the statement and book balances is explained by the uncleared check:
$11,475 − $400 = $11,075
During September’s reconciliation, leave the $400 check unchecked.
Once all the other cleared transactions are matched, the reconciliation difference can be $0.00.
This means the cleared items agree with the statement. It does not mean every transaction in the account has cleared.
When the $400 check appears on the October statement, you can mark it during October’s reconciliation.
This is why you should review outstanding transactions before changing a correct account balance.
How to View a Reconciliation Report in QuickBooks
A reconciliation report shows the beginning and ending balances used for a completed reconciliation. It also lists the transactions cleared and left uncleared at that time.
Keep these reports so you can review earlier work if a balance changes later.
View a report in QuickBooks Online
- Go to Reports → Standard reports.
- Search for Reconciliation Reports.
- Select the report.
- Choose the account.
- Select the reconciliation period.
- Click View Report.
You can also open past reports through History by account on the Reconcile page.
To print the report, select the Print icon.
QuickBooks Online does not support direct Excel export for this report through its normal export option. You can copy the report data into Excel if you need a spreadsheet.
Remember that the reconciliation report is a saved record of the completed reconciliation. It does not update when someone later changes a transaction.
View a report in QuickBooks Desktop
- Go to Reports → Reports Center.
- Find Previous Reconciliation.
- Select the bank account.
- Choose the report you need, such as Summary or Detail.
- Display or print the report.
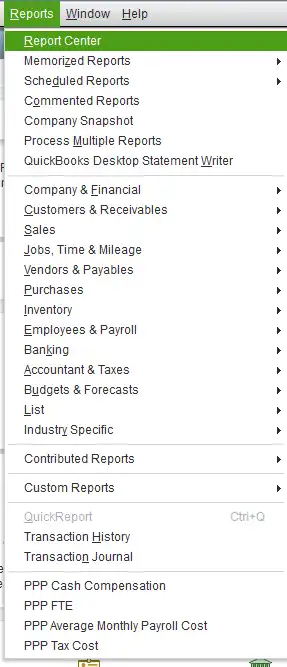
A previous reconciliation report can help you find differences between an earlier statement and the account’s current records.
How to Undo a Reconciliation in QuickBooks
You can undo reconciliation work in QuickBooks, but the available options differ between Online and Desktop.
Undoing a completed period can affect earlier records and later reconciliations. Check whether you only need to fix one transaction before undoing the entire period.
Undo a reconciliation in QuickBooks Online
Intuit allows the following user roles to undo a full reconciliation:
- Primary admin
- Company admin
- In-house accountant
- An accountant user with client access through QuickBooks Online Accountant
To find the option:
- Go to All apps → Accounting → Reconcile.
- Select History by account.
- Choose the account and date range.
- Find the reconciliation.
- Open the Action dropdown and select Undo.
- Review the warning and confirm only if you intend to reverse the reconciliation.
Undoing a full reconciliation also undoes reconciliations completed after it for that account.
For example, if you undo March after completing April, May, and June, those later reconciliations will also be undone.
QuickBooks also deletes the affected reconciliation reports and attachments. Save any files you need before continuing.
Read Intuit’s undo reconciliation instructions before making the change.
Undo a reconciliation in QuickBooks Desktop
QuickBooks Desktop provides an Undo Last Reconciliation option in the Reconcile setup window.
This reverses the last reconciliation and changes the cleared status of the affected transactions. It also changes the beginning balance used for the next reconciliation.
Create a backup and review the affected records before using the option.
If an older reconciliation needs correction, ask your accountant to review the safest approach rather than changing several completed months without a clear plan.
How to Reconcile Credit Card Accounts in QuickBooks
QuickBooks can reconcile credit card accounts using the same basic method as bank accounts.
Select the credit card account and compare its transactions with the monthly credit card statement.
Review purchases, refunds, finance charges, and payments to the card issuer.
One issue to watch for is a credit card payment recorded twice.
Suppose your business uses a credit card to buy $500 of office supplies. The purchase is recorded as an expense.
Later, you pay $500 from your checking account to the credit card company.
That payment should reduce the credit card balance. It should not create another $500 office supply expense.
In QuickBooks Online, the Pay down credit card feature is the primary method for recording credit card payments. You can find it under + Create → Other → Pay down credit card.
If both accounts are connected through bank feeds, you can also use the supported credit card payment or transfer workflow.
Match downloaded payment entries to the existing record rather than adding the payment again.
For detailed payment steps, refer to Intuit’s credit card payment guide.
When Should You Ask an Accountant for Help?
Some reconciliation differences are simple to fix. A missing bank fee or a payment entered in the wrong amount may only need one correction.
Other problems need a closer review.
Ask an accountant before making changes if:
- The beginning balance has been wrong for several months.
- Past reconciled transactions were deleted or changed.
- You need to adjust entries from a closed accounting period.
- QuickBooks suggests a reconciliation adjustment you cannot explain.
- Several months of reconciliation need to be reversed.
Avoid changing old transactions just to make the difference reach zero. Those changes may affect financial reports or later reconciliations.
If your accounts have several months of unresolved differences, bank and credit card reconciliation services may help you review the records and clear the backlog.
Conclusion
After completing a QuickBooks bank reconciliation, save the report and check the transactions that remain uncleared.
When the next bank statement arrives, start with the balance from the last completed period. Check new payments and deposits rather than changing old records without a clear reason.
Making reconciliation part of your monthly business accounting workflow can help you find errors before they carry into another month.
Frequently Asked Questions
Can I reconcile QuickBooks without connecting my bank account?
Yes, you can enter transactions manually and reconcile them against your bank statement. A bank feed is helpful, but it is not required to reconcile an account.
How often should I reconcile bank accounts in QuickBooks?
Reconcile each bank and credit card account every month after receiving its statement. If your business has many daily transactions, you can review bank feed activity more often while still completing the formal monthly reconciliation.
What does R mean in QuickBooks reconciliation?
R means the transaction is reconciled. C means it has been marked as cleared but is not reconciled. A blank status means the transaction has not been marked as cleared or reconciled. Avoid changing these marks without checking the transaction history.
Why does QuickBooks show a negative reconciliation difference?
A negative difference means the cleared balance and statement ending balance do not match. Check whether you selected an extra payment, missed a deposit, or entered the wrong statement balance. The sign alone does not identify the error.
Can I reconcile several months at once in QuickBooks?
You should reconcile each statement separately, starting with the oldest unreconciled month. If January, February, and March are pending, complete January first. This makes it easier to find which month contains an error.
Should I reconcile QuickBooks if the bank balance already matches?
Yes, Matching balances do not prove that every transaction is correct. Two errors can cancel each other out, or a transaction may be recorded in the wrong category. Reconciliation checks the transactions behind the balance.
What should I do if I find an unknown bank withdrawal?
Compare the withdrawal with your receipts, supplier payments, and other records. If you cannot identify it, contact your bank to investigate. Do not record it as a valid business expense until you know what the payment was for.
Can I reconcile multiple bank accounts in QuickBooks?
Yes, you can reconcile each checking, savings, or credit card account separately. Select the right QuickBooks account and use the matching bank statement. Do not combine transactions from different accounts into one reconciliation.
Accounts Confidant is an independent accounting and bookkeeping service provider and is not affiliated with Intuit.