As your business expands, daily tasks become easier when several employees can access the accounting data at the same time. With QuickBooks Desktop Multi-User Mode, authorized users can work on the same company file. Your accountant can reconcile accounts while your bookkeeper enters bills, and your sales team prepares invoices.
However, getting Multi-User Mode up and running isn’t always straightforward. Incorrect hosting settings, firewall restrictions, network issues, or problems with Database Server Manager can prevent users from accessing the company file and may trigger errors such as H101, H202, H303, or H505.
This guide will show you how QuickBooks multi-user mode functions, how to set it up properly, and how to deal with common connection problems.
What Is QuickBooks Desktop Multi-User Mode
The QuickBooks multi-user mode enables a number of authorized users to work at the same time in the same QuickBooks company file from different computers that are connected to the same network.
A typical multi-user environment includes:
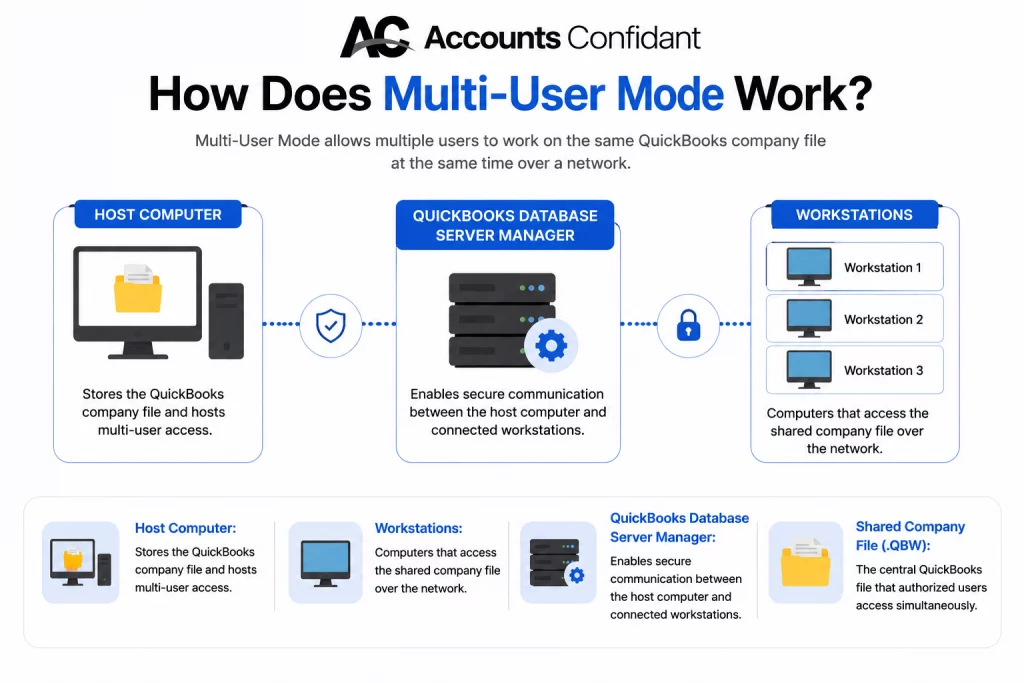
- Host Computer: Stores the QuickBooks company file and hosts multi-user access.
- Workstations: Computers that access the shared company file over the network.
- QuickBooks Database Server Manager: Facilitates secure communication between the host computer and connected workstations.
- Shared Company File (.QBW): The central QuickBooks file that authorized users access simultaneously.
The maximum number of concurrent users depends on the QuickBooks license and edition. Businesses should verify their license limits before adding new users to their network.
How Does Multi-User Mode Work?
QuickBooks stores the company file on a designated host computer or server. Other computers on the same network, often called workstations, connect to that file through the QuickBooks Database Server Manager, which manages communication between QuickBooks and the shared company file.
When configured correctly, users can collaborate in real time while QuickBooks maintains record-level locking to reduce editing conflicts.
Some people get confused between single mode and multi-mode, and it’s important to learn the distinction between the two.
Benefits of using QuickBooks Multi-User Mode
Using QuickBooks Desktop in multi-user mode can help teams work together, save time, and keep accounting data organized.
- Improves Team Collaboration: Multiple users can work in the same QuickBooks company file at the same time. This means team members do not have to wait for someone else to finish.
- Increases Productivity: Team members can handle tasks at the same time, such as invoicing, payroll, bill payments, and reports. This can help save time and keep work moving.
- Keeps Financial Data in One Place: All users work from the same company file. This helps prevent duplicate work and reduces the risk of using different versions of financial data.
- Supports User Permissions: QuickBooks lets administrators set user roles and permissions. This helps protect sensitive financial information by giving each user access only to the features they need.
- Reduces Work Delays: When the network is set up correctly, multiple users can work at the same time. This reduces delays caused by having only one person use the company file at a time.
Some people get confused between single-user and multi-user, and it’s important to learn the distinction between the two.
Single-User Mode vs. Multi-User Mode in QuickBooks Desktop
The decision between using Single-User Mode and QuickBooks Desktop Multi-User Mode is based on the way your business operates.
| Feature | Single-User Mode | Multi-User Mode |
| Number of users | One user at a time | Multiple authorized users simultaneously |
| Company file access | Exclusive access | Shared access over a network |
| Best suited for | Administrative tasks, company setup, and data maintenance | Daily accounting, bookkeeping, invoicing, payroll, and reporting |
| Hosting requirement | Not required | Requires a host computer and QuickBooks Database Server Manager |
| Network connection | Not required | Required |
| User collaboration | Not available | Supported |
| Typical users | Small businesses with one accounting user | Businesses with multiple accounting staff |
Moving forward, we will learn the steps for QuickBooks multi-user mode setup.
How to Set Up Multi-User Mode in QuickBooks Desktop
Setting up QuickBooks Desktop Multi-User Mode involves more than simply turning on a setting.
To set up QuickBooks Multi-User Mode correctly, follow these steps.
Step 1: Choose the Host Computer
The first step is selecting the computer that will host your QuickBooks company file. This computer stores the .QBW file and manages access for all connected workstations.
Here are the following things you should keep in mind:
- You must keep the power on during business hours.
- Also, make sure that you are on the same local network as all the workstations.
- It should have enough storage space and processing power to handle multiple users.
- Best of all, it should function as a dedicated server when many employees are accessing QuickBooks at the same time.
The next step is to install QBD.
Step 2: Install QuickBooks Desktop
Install QuickBooks Desktop on:
- Open the QuickBooks.exe installer and go to Custom and Network Options, then click Next.
- Choose the installation option that matches your setup, such as a workstation, a computer that will host and run QuickBooks, or a server that only stores company files.
- Select Next and, if needed, change the installation location.
- Select Next to start the installation, and when the installation finishes, select Open QuickBooks.
Ensure all computers are running the same QuickBooks Desktop year and have the latest maintenance updates installed. Then, follow the next step.
Step 3: Install QuickBooks Database Server Manager
The QuickBooks Database Server Manager allows workstations to communicate with the hosted company file over the network.
To install it:
- Open the QuickBooks Desktop installer and select Custom or Network Options.
- Choose the appropriate server setup option and follow the on-screen instructions to complete the installation.
- If you are asked to, restart the computer.
After you have installed it, open the Database Server Manager in order to set up access to the company file.
Step 4: Scan the Company File Folder
Before workstations can access the company file, the Database Server Manager must scan the folder where the .QBW file is stored.
To scan the folder:
- Open QuickBooks Database Server Manager and Select the Scan Folders tab.

- Click Browse and choose the folder containing your company file.
- Finally, click on Start Scan and begin the process.
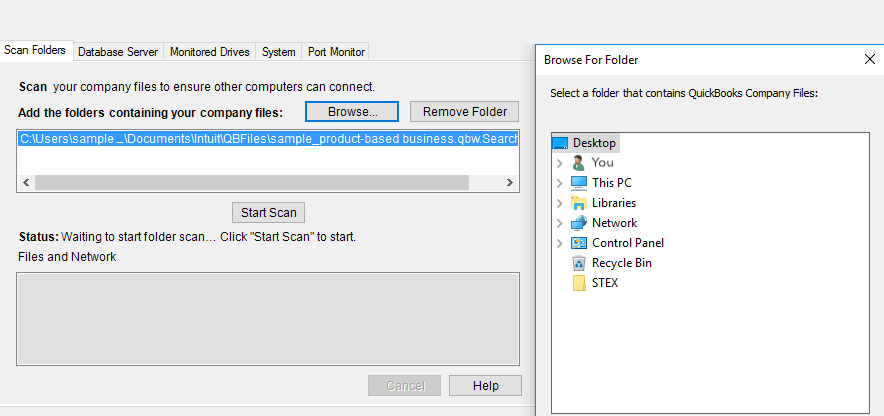
The scan creates or updates the required .ND (Network Descriptor) file, which helps workstations locate the company file across the network.
Step 5: Configure Folder Permissions
The folder containing the QuickBooks company file must be shared with users who need access.
Verify that:
- The folder is shared over the network.
- Authorized users have full control or the required read/write permissions.
- The Windows account running QuickBooks Database Server Manager can access the folder.
Improper permissions are one of the most common causes of QuickBooks Multi-User Mode not working.
Step 6: Configure Firewall and Security Software
Firewalls can prevent QuickBooks from communicating across the network. Review your Windows Firewall or third-party security software to ensure QuickBooks Desktop services are allowed through the firewall. This includes:
- QuickBooks Desktop
- QuickBooks Database Server Manager
- QuickBooksDBXX service (version-specific)
- QBUpdate.exe
If necessary, create inbound and outbound firewall rules using the ports recommended by Intuit.
Step 7: Enable Hosting on the Host Computer
After configuring the server, enable hosting on the host computer.
To do this:
- First, open QuickBooks Desktop on the host computer.
- Second, select File from the top menu.
- Third, if you see Host Multi-User Access, select it.
- Finally, confirm the changes when prompted.
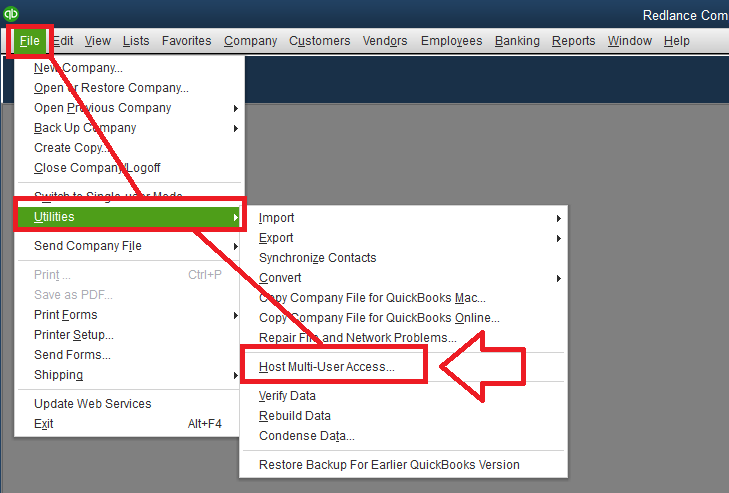
If the menu displays Stop Hosting Multi-User Access, hosting is already enabled on that computer.
Important: Workstations should not have hosting enabled. If a workstation displays Stop Hosting Multi-User Access, disable hosting to avoid network conflicts.
Step 8: Open the Company File from Workstations
- Select Open or Restore an Existing Company on QBD.
- Browse to the shared company file on the host computer.
- Sign in using your QuickBooks user credentials.
Each employee should have their own QuickBooks user account with the appropriate permissions.
Step 9: Verify Multi-User Access
Once everyone is connected:
- Confirm multiple users can access the company file simultaneously.
- Verify that users can create transactions without interruption.
- Check that reports, invoices, and customer records load normally.
- Ensure no H-series errors appear during access.
If users experience connection problems, review hosting settings, firewall rules, and Database Server Manager before proceeding with additional troubleshooting.
How to Switch to Multi-User Mode in QuickBooks Desktop
If you’re currently working in Single-User Mode and need to collaborate with others, switching to Multi-User Mode only takes a few steps.
- Open the company file in QuickBooks Desktop.
- Select File from the top menu.
- Choose Switch to Multi-User Mode.
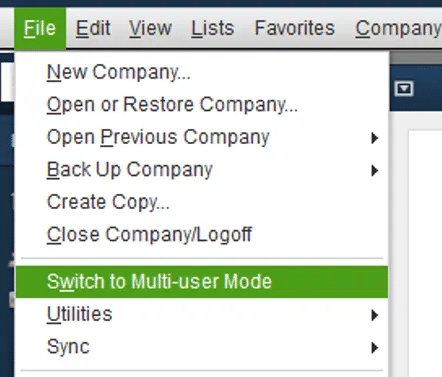
QuickBooks will reconnect the company file in multi-user mode, allowing other authorized users to access it over the network.
If the option is unavailable or you receive an H-series error, verify that:
- The company file is hosted correctly.
- Database Server Manager is running.
- No workstation is incorrectly hosting the company file.
- Windows Firewall isn’t blocking QuickBooks services.
Why Is QuickBooks Multi-User Mode Not Working?
After completing the QuickBooks multi-user mode setup, users may still encounter connection problems when opening the company file. In most cases, the issue isn’t with QuickBooks itself but with the network configuration, hosting settings, or communication between the host computer and connected workstations.
Problems such as H101, H202, H303, and H505 usually indicate that QuickBooks cannot establish a connection to the company file hosted on another computer.
Having trouble with QuickBooks Multi-User Mode? Learn about the common causes and step-by-step solutions in our guide on how to fix QuickBooks Multi-User Mode not working.
Understanding H-Series Errors in QuickBooks Multi-User Mode
When QuickBooks cannot communicate with the host computer, it may display an H-series error. Although each error has a different cause, they all indicate that the workstation is unable to access the shared company file correctly.
| Error Code | What It Indicates | Common Cause | Recommended Solution |
| H101 | The company file is on another computer that requires additional configuration. | Incorrect hosting configuration or network communication issue. | Verify hosting settings, restart QuickBooks services, and confirm the host computer is properly configured. |
| H202 | QuickBooks cannot establish a connection with the host computer. | Firewall restrictions, Database Server Manager issues, DNS problems, or blocked network communication. | Run QuickBooks File Doctor, verify firewall settings, restart QuickBooksDBXX services, and scan the company file folder. |
| H303 | The workstation needs additional configuration to communicate with the host. | Improper hosting setup or missing network configuration. | Confirm the host computer is configured correctly, restart Database Server Manager, and verify Windows permissions. |
| H505 | The company file is located on another computer, and QuickBooks cannot access it. | Multiple computers hosting the file, firewall restrictions, or network configuration problems. | Ensure only one host computer is enabled, restart QuickBooks services, verify firewall rules, and re-scan the company file folder. |
Note: While these H-series errors have different triggers, the troubleshooting steps, including verifying hosting settings, checking Database Server Manager, reviewing firewall rules, and using the QuickBooks Tool Hub, are common.
Conclusion
QuickBooks Desktop Multi-User Mode can significantly improve collaboration by allowing multiple users to work in the same company file simultaneously. However, achieving a reliable multi-user environment depends on proper setup, including selecting a single host computer, installing QuickBooks Database Server Manager, configuring network and firewall settings, and maintaining the host system.
If businesses follow the troubleshooting steps and best practices described in this guide, they will be able to create a more stable QuickBooks environment and reduce the disruptions to their daily accounting operations.
Frequently Asked Questions
I’m getting QuickBooks Error H202 when I try to switch to multi-user mode. How do I fix it?
Error H202 usually indicates that QuickBooks cannot communicate with the host computer. Start by confirming that only one computer is hosting the company file, verify that QuickBooks Database Server Manager is running, check your firewall settings, and use QuickBooks File Doctor if the issue persists.
My team can’t access our QuickBooks company file at the same time. What’s wrong?
This typically occurs when Multi-User Mode hasn’t been configured correctly. Common causes include incorrect hosting settings, firewall restrictions, insufficient folder permissions, or problems with the Database Server Manager.
I fixed QuickBooks H505 last week, but it’s back today. Why does it keep happening?
Recurring H505 errors often point to an underlying network issue rather than a one-time software problem. Firewall changes, Windows updates, stopped QuickBooks services, incorrect hosting settings, or network interruptions can cause the error to reappear.
How do I set up QuickBooks multi-user mode correctly the first time?
Choose a dedicated host computer, install QuickBooks Database Server Manager, scan the company file folder, configure Windows permissions and firewall exceptions, enable hosting only on the host computer, and connect workstations to the shared company file.
Which computer should host the QuickBooks company file?
The host should be the computer or server that stores the QuickBooks company file and remains available whenever users need access. Only this computer should have hosting enabled.
QuickBooks says another computer is hosting the file, but it isn’t. What should I do?
Check every workstation to ensure hosting is disabled. Only the designated host computer should display Stop Hosting Multi-User Access. If multiple computers are hosting the file, disable hosting on the workstations and restart QuickBooks.
Is QuickBooks Database Server Manager required for multi-user mode?
Yes, if your company file is shared over a network, QuickBooks Database Server Manager is required to manage access and allow workstations to connect to the hosted company file.
Can a firewall cause QuickBooks multi-user mode errors?
Yes, incorrect firewall or antivirus settings can block communication between the host computer and workstations, resulting in H-series errors or preventing users from opening the company file.
Should I call someone for QuickBooks multi-user setup, or can I fix it myself?
Many setup issues can be resolved by following Intuit’s official instructions for hosting, firewall configuration, and Database Server Manager. However, if you’ve completed the recommended troubleshooting steps and continue to experience recurring H-series errors, consulting a qualified QuickBooks professional may help identify more complex network or configuration issues.