The QuickBooks missing PDF component error appears when QuickBooks Desktop cannot create a PDF file. You may see it while saving an invoice, printing a report, or emailing a customer. The error can also appear after a Windows update or when you install QuickBooks on a new computer.
The message usually reads:
“QuickBooks detected that a component required to create PDF files is missing.”
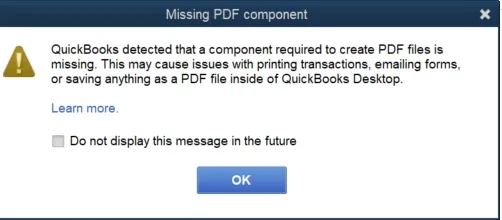
QuickBooks Desktop uses parts of Microsoft XPS Document Writer during PDF creation. If this Windows feature is disabled or cannot work correctly, QuickBooks may fail to save or email PDFs.
Quick fix: Enable Microsoft XPS Document Writer through Windows Features, then run the QuickBooks Print & PDF Repair Tool from QuickBooks Tool Hub. If the error remains, test XPS printing from Notepad to find out whether Windows or QuickBooks is causing the problem.
This guide explains how to fix QuickBooks missing PDF component errors on Windows 11 and Windows 10, including cases where the usual repair tool does not work.
What Does the QuickBooks Missing PDF Component Error Mean?
The QuickBooks PDF component missing error means QuickBooks cannot access or use a component needed to create PDF documents.
Microsoft XPS Document Writer is a Windows print-to-file feature that creates XPS documents. QuickBooks Desktop uses parts of this feature to produce PDFs for invoices, reports, and other forms.
When the required component cannot work, QuickBooks may display an error instead of generating the PDF.
You may notice these symptoms:
- QuickBooks cannot save an invoice or report as a PDF.
- An invoice email is sent without its PDF attachment.
- The PDF component warning appears when printing a transaction.
- QuickBooks stops responding while preparing a PDF.
- A PDF error appears after installing QuickBooks or updating Windows.
The error does not automatically mean your company file is damaged. The problem may involve Windows printing services, user permissions, or QuickBooks printer settings.
Other PDF component error messages in QuickBooks
The exact message may differ depending on the affected component.
Common variations include:
- “Component required for PDF print from QuickBooks is missing.”
- “QuickBooks can’t complete the current action due to a missing component: Missing pdf file component.”
- “QuickBooks could not save your form or reports as a .pdf.”
- “Unable to save as .pdf file.”
- “PDF Converter shows offline.”
- “You cannot print directly to the QuickBooks PDF Converter.”
Intuit includes these messages in its official QuickBooks PDF and Print troubleshooting guide.
However, they do not always have the same cause. A missing PDF file component may point toward XPS or permissions, while a PDF Converter message can also involve printer configuration.
Why Is QuickBooks Desktop Missing a PDF Component?
The QuickBooks Desktop missing PDF component error usually involves a problem with PDF creation, Windows printing, or the application’s settings.
| Possible cause | How it affects QuickBooks |
| Microsoft XPS Document Writer is disabled | QuickBooks cannot use the required Windows feature. |
| Damaged XPS printer configuration | Windows may fail to create an XPS document. |
| Print Spooler service is stopped | Windows cannot process certain print jobs. |
| Incorrect Temp folder permissions | QuickBooks may be unable to create temporary files. |
| Damaged QuickBooks printer settings | Saved printing preferences may interfere with PDF creation. |
| QuickBooks installation problems | Application components may fail during printing or PDF creation. |
| Security software restrictions | XPS file creation or access to temporary files may be blocked. |
A QuickBooks PDF component missing after Windows update error may be related to changed printing settings or Windows components. However, the timing alone does not prove that the update caused the problem.
The same checks apply when the error begins after installing QuickBooks on another computer.
How to Fix QuickBooks Missing PDF Component Error
Start with Microsoft XPS Document Writer and the QuickBooks PDF repair utility. These are the main checks recommended by Intuit.
Test PDF creation after each fix. If the error disappears, you do not need to complete the remaining steps.
Fix 1: Enable Microsoft XPS Document Writer
If Windows has disabled Microsoft XPS Document Writer, QuickBooks may display the missing PDF component error when saving invoices or reports.
To enable it on Windows 11 or Windows 10:
- Close QuickBooks Desktop.
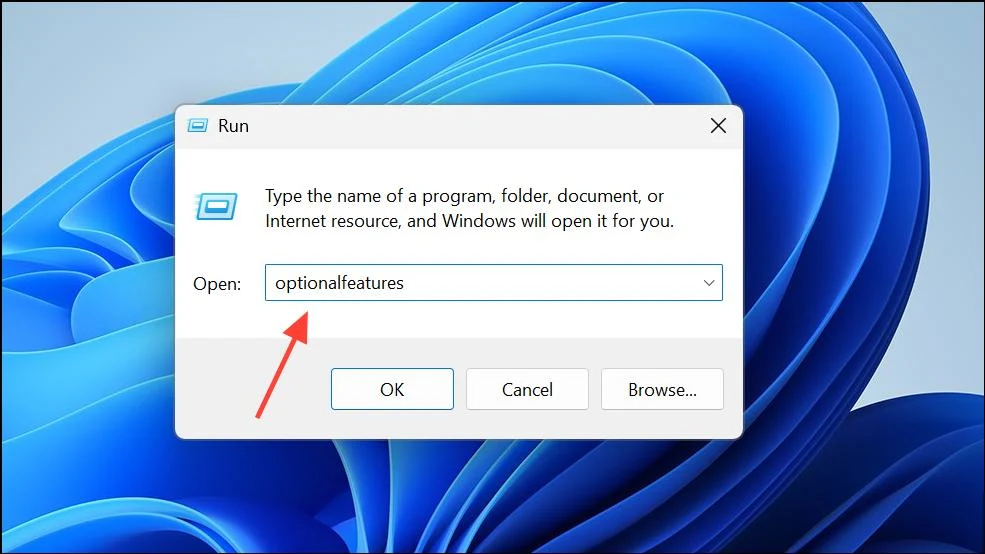
- Press Windows + R to open Run.
- Type optionalfeatures and press Enter.

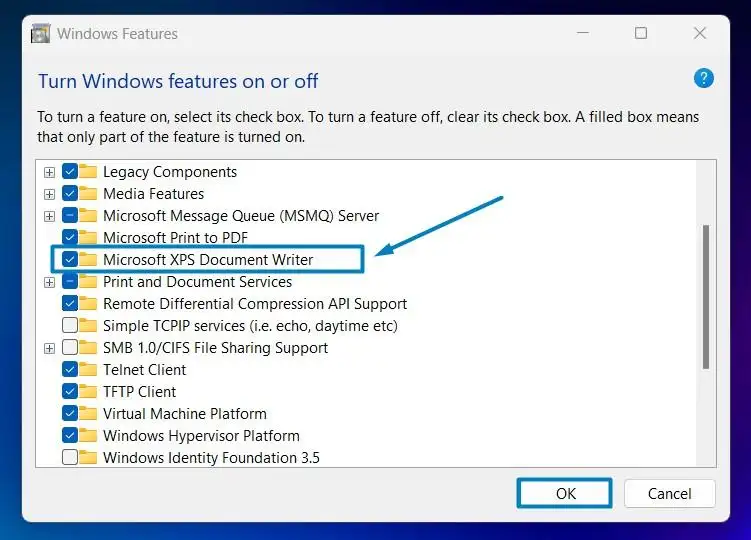
- Find Microsoft XPS Document Writer in the Windows Features list.
- Select its checkbox if it is unchecked.
- Click OK to apply the change.
- Restart your computer if Windows asks you to.
Open QuickBooks and try saving an invoice as a PDF.
On Windows 11, you can also access the feature through:
Settings > System > Optional features > More Windows features
Microsoft confirms that XPS Document Writer is included with Windows 11 but may not always be enabled.
If the feature is already selected, continue to the repair tool. You can test or reinstall XPS later if the error remains.
Fix 2: Run the QuickBooks Print & PDF Repair Tool
The QuickBooks Print & PDF Repair Tool helps troubleshoot errors related to printing, emailing forms, and creating PDF files.
It is available through QuickBooks Tool Hub.
Follow these steps:
- Close QuickBooks Desktop.
- Open QuickBooks Tool Hub.
- Select Program Problems.
- Click QuickBooks Print & PDF Repair Tool.
- Allow the utility to finish.
- Reopen QuickBooks.
- Try saving or printing the affected document.
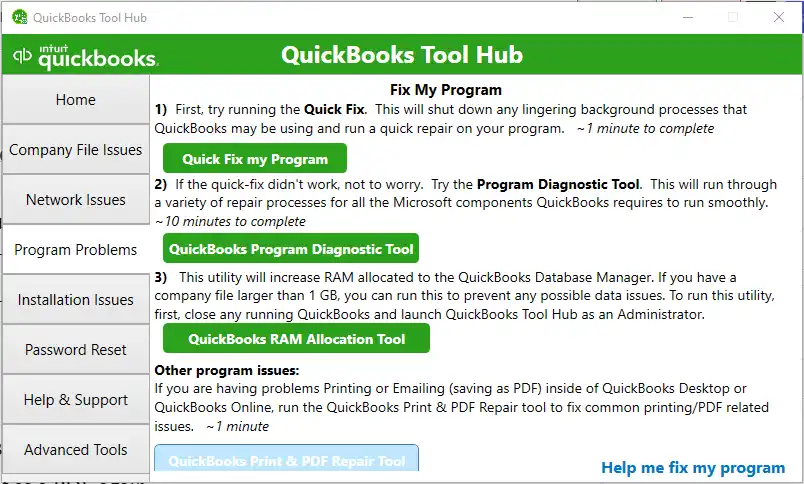
If Tool Hub is not installed, download it using Intuit’s official instructions. You can also follow our QuickBooks Tool Hub download and installation guide.
The utility may resolve common PDF creation problems without reinstalling QuickBooks.
If it finishes successfully but the error remains, move to the next check rather than running it repeatedly.
Fix 3: Test Microsoft XPS Document Writer Outside QuickBooks
If the QuickBooks PDF component is missing but XPS is enabled, check whether Windows can create an XPS document.
An enabled checkbox does not guarantee that the printer works.
Use Notepad to test it:
- Open Notepad.
- Type a short sentence, such as “QuickBooks PDF test.”
- Select File > Print.
- Choose Microsoft XPS Document Writer.
- Click Print.
- Enter a filename and save the document to your Desktop.
- Check whether Windows created the XPS file.
The result helps narrow down the problem.
If the XPS file is created: The current Windows user can print to XPS from Notepad. Continue checking QuickBooks settings and permissions. This test does not guarantee that every QuickBooks printing dependency works.
If the XPS file is not created: Investigate the Windows XPS feature, Print Spooler, printer configuration, or permissions.
If Microsoft XPS Document Writer does not appear in the printer list, return to Fix 1.
Intuit recommends testing XPS printing outside QuickBooks when PDF creation or emailing fails.
Fix 4: Restart the Windows Print Spooler Service
The Windows Print Spooler manages print jobs. If it stops or fails to process jobs, QuickBooks may encounter printing problems.
To check the service:
- Press Windows + R.
- Type services.msc and press Enter.
- Locate Print Spooler.
- Check its status.
- If it is stopped, right-click it and select Start.
- If it is already running but printing fails, right-click and select Restart.
- Open Properties and check the startup type.
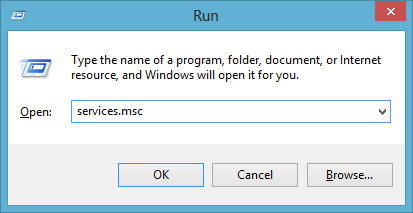
For a standard Windows printing setup, the startup type should normally be Automatic.
If your computer is managed by an organization, check with its administrator before changing the service settings.
After restarting the service, open QuickBooks and try creating a PDF.
If the Print Spooler repeatedly stops, follow Microsoft’s Print Spooler troubleshooting instructions.
Restarting the service is most relevant when printing also fails in other Windows applications. It is not a confirmed solution for every QuickBooks missing PDF component error.
Fix 5: Update QuickBooks Desktop
If your QuickBooks version is supported, install any available maintenance updates before attempting more extensive repairs.
To check for updates:
- Open QuickBooks Desktop.
- Select Help > Update QuickBooks Desktop.
- Open the Update Now tab.
- Click Get Updates.
- Wait for the download to finish.
- Close and reopen QuickBooks.
- Install the update if prompted.
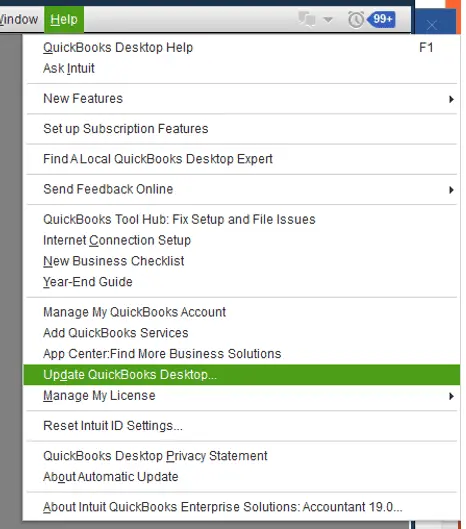
Try creating the PDF again.
For other update methods, read our guide on how to update QuickBooks Desktop.
A maintenance update installs fixes for your existing QuickBooks version. It does not upgrade QuickBooks Desktop 2023 to QuickBooks Desktop 2024.
If your version is no longer supported, updates and certain connected services may not be available.
Fix 6: Check Windows Temp Folder Permissions
QuickBooks uses temporary files while completing certain tasks, including PDF creation. If your Windows account cannot write to the Temp folder, the operation may fail.
First, restart Windows and test QuickBooks again.
If the error remains:
- Press Windows + R.
- Type %TEMP% and press Enter.
- Check whether the folder opens.
- If your organization’s policies allow it, try creating and deleting a temporary test text file.
- Right-click an empty area inside the folder and select Properties.
- Open the Security tab.
- Select your Windows account and review its permissions.
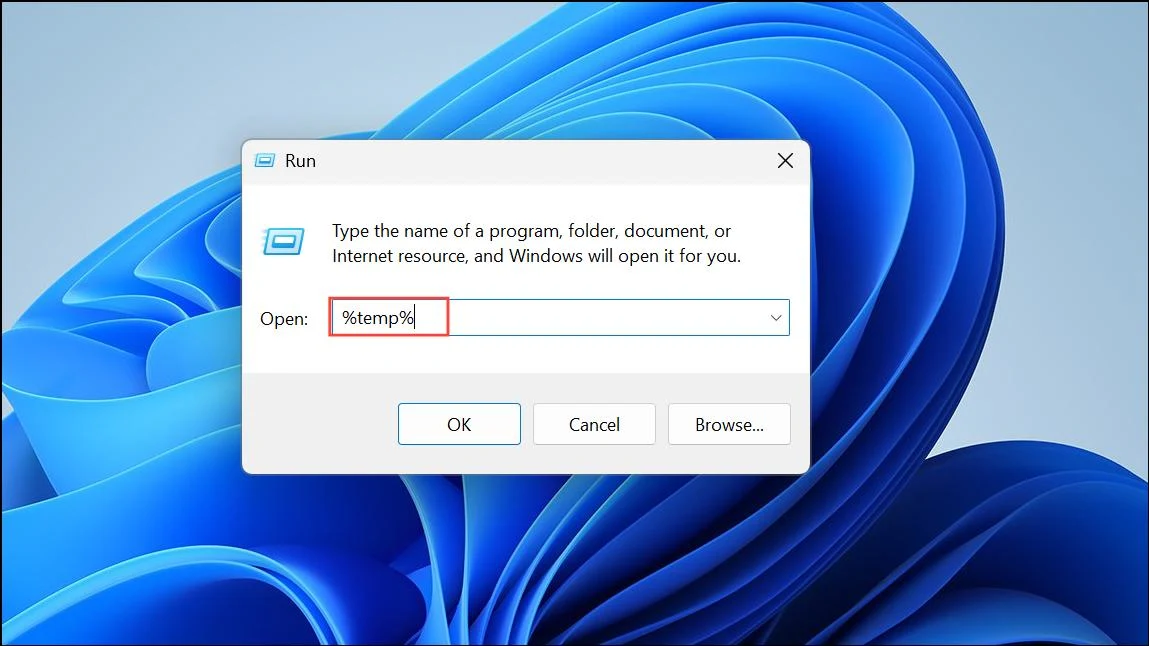
Your account needs appropriate access to create and modify temporary files.
If Windows displays Access denied, or your account cannot create a test file, ask your administrator to review the folder’s access settings.
Intuit includes resetting Temp folder permissions in its official PDF troubleshooting instructions. However, its guidance to grant broad Full Control permissions should be assessed carefully on shared or managed systems.
Do not change ownership or grant unrestricted folder access without understanding the security implications.
After correcting a confirmed permission issue, test PDF creation again.
Fix 7: Repair Microsoft XPS Document Writer
If XPS Document Writer is enabled but cannot create a document from Notepad, try reinstalling the Windows feature.
Microsoft documents disabling and re-enabling the feature as a repair option.
Follow these steps:
- Close QuickBooks and other open applications.
- Press Windows + R.
- Type optionalfeatures and press Enter.
- Uncheck Microsoft XPS Document Writer.
- Click OK and allow Windows to apply the change.
- Restart Windows.
- Open Windows Features again.
- Recheck Microsoft XPS Document Writer.
- Click OK and restart if prompted.
Run the Notepad XPS test again before opening QuickBooks.
If Windows still cannot create an XPS document, ask an IT professional to review the printer configuration, Windows permissions, and security software.
Intuit notes that certain security applications can block XPS file creation. Check the relevant security settings rather than disabling antivirus or firewall protection across the computer.
Do not download replacement XPS drivers from unfamiliar websites.
Fix 8: Rename the QBPrint.qbp File
The QBPrint.qbp file stores QuickBooks printer settings. Damaged settings can interfere with printing or saving forms.
Renaming this file allows QuickBooks to create a new printer configuration.
- Close QuickBooks Desktop.
- Open File Explorer.
- Navigate to:
C:\ProgramData\Intuit\QuickBooks 20xx - Replace 20xx with your QuickBooks version year.
- Find the QBPrint.qbp file.
- Right-click it and select Rename.
- Change its name to QBPrint.qbp.old.
- Reopen QuickBooks Desktop.
- Go to File > Printer Setup.
- Select a transaction type from the Form Name list.
- Click OK.
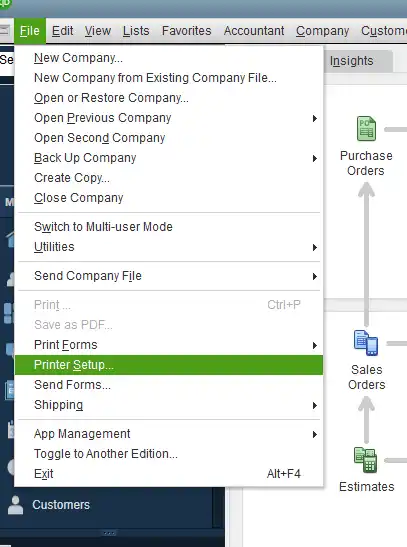
QuickBooks should create a new QBPrint.qbp file.
The ProgramData folder may be hidden. Enable Hidden items in File Explorer if you cannot locate it.
This procedure can reset stored printer preferences. Review your settings after the file is recreated.
Intuit explains the procedure in its QuickBooks Desktop printing troubleshooting guide.
If you use QuickBooks through Remote Desktop or Terminal Services, the printer settings file may exist in additional user-specific locations. Have your server administrator identify the correct file before renaming anything.
Fix 9: Test a Sample Company File Before Repairing QuickBooks
If XPS printing works in Notepad but QuickBooks still cannot create PDFs, determine whether the problem affects one company file or the entire application.
Intuit recommends testing printing with a QuickBooks sample company file.
Step 1: Test a different form
Open your company file and try creating a PDF from a standard report or another invoice template.
For example, if a customized invoice fails but a standard Profit and Loss report saves correctly, the problem may involve that invoice template.
You can try another template before changing the QuickBooks installation.
Step 2: Test a sample company file
- Close your current company file.
- Return to the QuickBooks company selection screen.
- Choose the option to open a sample company file.
- Open an available sample business.
- Try creating a PDF from a standard report or invoice.
If you do not see a sample-file option, its location may differ depending on the product version and installation.
If PDF creation works in the sample company: The problem may involve settings, forms, or data in your regular company file. This does not prove that the file is damaged.
If PDF creation also fails in the sample company: A wider QuickBooks installation or Windows printing problem becomes more likely.
Do not run Rebuild Data solely because a PDF cannot be created. If the evidence points to company-file damage, back up the file and follow the appropriate Intuit data-integrity instructions.
Step 3: Run Quick Fix my Program
If PDF creation fails across company files and Windows XPS printing works, try repairing QuickBooks.
- Close QuickBooks Desktop.
- Open QuickBooks Tool Hub.
- Select Program Problems.
- Click Quick Fix my Program.
- Allow the repair to finish.
- Reopen QuickBooks and test PDF creation.
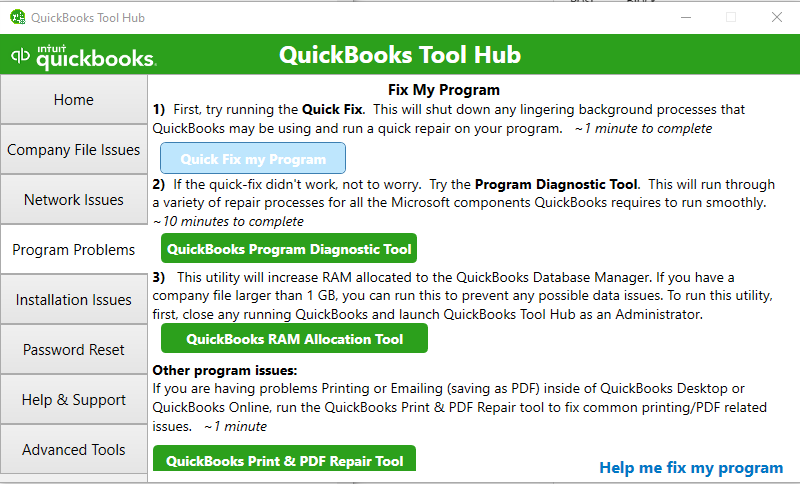
If QuickBooks began displaying errors immediately after installation, consider running QuickBooks Install Diagnostic Tool from Tool Hub > Installation Issues.
For detailed instructions, see our QuickBooks Install Diagnostic Tool guide.
Intuit also provides official QuickBooks Desktop repair instructions.
Reinstalling QuickBooks should be considered only when the troubleshooting results suggest an installation problem and less disruptive repairs have failed.
Back up your company files before making major installation changes. A reinstall will not necessarily repair a broken Windows XPS component.
What If the QuickBooks PDF & Print Repair Tool Doesn’t Work?
If the repair tool completes but the error remains, identify where PDF creation fails before attempting another repair.
The following results can help you choose the next step.
| Troubleshooting result | Recommended next action |
| XPS Document Writer is missing | Enable it through Windows Features. |
| XPS is enabled but fails in Notepad | Repair the Windows XPS feature and check Print Spooler. |
| XPS works, but QuickBooks cannot create PDFs | Review QuickBooks settings, Temp permissions, and available updates. |
| PDF creation fails only for a customized invoice | Test a standard template. |
| PDFs work in a sample company but not your company | Investigate company-specific forms, settings, or data. |
| PDFs fail in every company file | Consider Quick Fix my Program and installation diagnostics. |
| The PDF saves but the email does not send | Investigate QuickBooks email settings. |
| The error returns after restarting Windows | Check whether printer features and service settings remain correct. |
QuickBooks PDF component missing but XPS is enabled
An enabled XPS feature is only the first requirement. The current Windows user must also be able to create an XPS file.
If the Notepad test succeeds, investigate QuickBooks-specific settings and temporary-file permissions.
Check whether the printer appears under the expected name, Microsoft XPS Document Writer. A printer that has been renamed or configured differently may need review.
Some community users have reported success after restoring the default printer name, but this is not an established fix for every installation.
QuickBooks PDF Converter missing or showing offline
A message stating that the QuickBooks PDF Converter is missing or offline belongs to the wider group of PDF and printing errors documented by Intuit.
Start with the Print & PDF Repair Tool and check XPS printing.
Do not assume that manually installing a third-party PDF printer will fix the problem. The error may involve QuickBooks printer settings or a different Windows printing component.
QuickBooks PDF component error when opening the program
Some users report a missing PDF component warning when QuickBooks opens, before they attempt to save an invoice.
If this happens, record the exact error message and check whether QuickBooks can open a sample company and create a PDF.
A warning at startup does not establish that Microsoft XPS Document Writer is the cause. Installation problems or other application errors may require separate investigation.
If QuickBooks also freezes or stops responding, see our guide to QuickBooks freezing for troubleshooting beyond PDF creation.
Why Does QuickBooks Show a Missing PDF Component After a Windows Update or New Installation?
A QuickBooks PDF component missing after Windows update problem may occur when Windows printing features, permissions, or printer configuration no longer work as expected.
A similar error can appear after moving QuickBooks to another PC.
The appropriate check depends on what changed.
QuickBooks missing PDF component after Windows 11 update
If QuickBooks worked before a Windows update but can no longer create PDFs, check whether Microsoft XPS Document Writer still works.
Start with Windows Features, then use the Notepad XPS test.
If printing fails across several applications, focus on Windows printing services before repairing QuickBooks.
A QuickBooks PDF component missing after reboot error may indicate that a printer setting or service is not remaining in its expected state. Check whether the feature and Print Spooler are still enabled after restarting.
Do not remove Windows updates merely because the error appeared afterward. Identify the affected component first.
QuickBooks missing PDF component on a new computer
The QuickBooks PDF component missing after installation error may occur because the new Windows environment has different printer settings, permissions, or software components.
For example, you may install QuickBooks Desktop 2024 on a new Windows 11 laptop and successfully open your company file, but receive a missing-component message when saving an invoice as a PDF.
In this situation, confirm that XPS works on the new computer before assuming that the transferred company file is damaged.
If you are experiencing a QuickBooks PDF component missing after moving to new computer problem, also confirm that the installed QuickBooks edition and version match your intended setup.
Our guide to moving QuickBooks to a new computer covers backup, installation, restoration, and post-transfer checks.
The same advice applies when the QuickBooks missing PDF component error starts after reinstalling Windows. A fresh Windows installation may need printing features or permissions configured again.
QuickBooks Desktop 2024 and 2023 PDF component errors
A QuickBooks Desktop 2024 missing PDF component Windows 11 error does not automatically mean QuickBooks is incompatible with the operating system.
Intuit lists Windows 11, 64-bit, as a supported operating system for QuickBooks Desktop 2024, provided the installation meets its other requirements.
See Intuit’s QuickBooks Desktop 2024 system requirements.
Users searching for QuickBooks Desktop 2023 PDF component missing should also check the product’s support status.
Intuit ended support for QuickBooks Desktop 2023 after May 31, 2026, including affected connected services. The product’s discontinuation does not itself explain an XPS or PDF creation error.
You can review Intuit’s Desktop 2023 service discontinuation policy.
For Windows 10 users, the general XPS troubleshooting process is similar. Microsoft ended standard Windows 10 support on October 14, 2025, although eligible devices may receive Extended Security Updates. The operating system’s support status is separate from the immediate cause of the missing PDF component error.
QuickBooks Enterprise missing PDF component on Windows Server
The QuickBooks missing PDF component on Windows Server problem may require different checks from a normal desktop installation.
For QuickBooks Enterprise users working through Remote Desktop or Terminal Services, investigate whether the failure affects one user or every session.
If one user cannot create PDFs, the administrator should review that user’s session, permissions, and printer configuration.
If every user is affected, shared printing components and the server configuration may need investigation.
Intuit states that some of its standard XPS repair instructions do not apply to Terminal Services environments. Do not reset shared server printer settings or rename printer configuration files without reviewing the impact on other users.
Why Is QuickBooks Missing the PDF Component When Sending Invoices?
A QuickBooks missing PDF component when sending invoices error may occur because QuickBooks cannot create the PDF attachment before handing the message to the email program.
However, not every missing invoice attachment is caused by an XPS problem.
First, open the invoice and try saving it as a PDF.
If QuickBooks cannot save the PDF: Investigate the PDF component using the earlier steps.
If the PDF saves successfully: Check the email configuration, attachment handling, and delivery method.
For example, a user may be able to create a PDF in QuickBooks but receive an Outlook error when sending the email. In that case, repairing XPS is unlikely to resolve the Outlook connection problem.
You can review your email settings under Edit > Preferences > Send Forms, although the available options depend on your QuickBooks version and configured email service.
For email-specific problems, see our guide to QuickBooks unable to send emails.
How to Confirm the QuickBooks Missing PDF Component Error Is Fixed
After applying the appropriate repair, test the task that originally failed.
- Open an invoice or report in QuickBooks Desktop.
- Save it as a PDF.
- Open the saved document and confirm that its contents display correctly.
- Try printing if printing was affected.
- Send a test invoice to an email address you control if the original problem involved attachments.
- Confirm that the email arrives with the correct PDF.
If the problem occurs only with a particular form, test that form again rather than assuming the error is fixed because a different report worked.
If the missing-component warning continues, record the following details before contacting Intuit Support or an IT professional:
- The exact error message.
- QuickBooks edition, product year, and release.
- Windows version.
- Whether XPS printing works from Notepad.
- Whether PDF creation works in a QuickBooks sample company.
- Whether the error affects printing, saving, emailing, or all three.
These details help identify the remaining problem without repeating unsuccessful repairs.
Conclusion
The QuickBooks missing PDF component error usually requires checking the Windows PDF creation process and the related QuickBooks printing settings.
If Microsoft XPS Document Writer works but QuickBooks still cannot generate PDFs, the sample company test is a useful next step. It helps separate problems affecting one company file from failures involving the wider application.
Avoid reinstalling QuickBooks or changing system permissions until the troubleshooting results point toward those actions.
Frequently Asked Questions
Can I fix QuickBooks missing PDF component without reinstalling QuickBooks?
Yes, many cases can be resolved by enabling Microsoft XPS Document Writer, using the Print & PDF Repair Tool, or correcting Windows settings. Reinstallation is usually a later option.
Is Microsoft XPS Document Writer required for QuickBooks PDFs?
QuickBooks Desktop uses parts of Microsoft XPS Document Writer for PDF creation. If the feature is disabled or cannot print correctly, saving or emailing PDFs from QuickBooks may fail.
Does QuickBooks need Adobe Acrobat Reader to create PDFs?
Adobe Acrobat Reader is mainly used to open and view PDF files. QuickBooks Desktop relies on its own software and Windows printing components to create PDFs. Reinstalling Adobe Reader is not the first fix for a missing PDF component error.
Why did the PDF component error appear after a Windows update?
A Windows update may change printing components, drivers, or settings. Check whether XPS Document Writer is enabled and working before making changes to QuickBooks.
Will fixing the PDF component delete my QuickBooks company file?
Enabling XPS, running the PDF repair tool, or resetting printer settings should not delete your company data. Still, create a backup before repairing or reinstalling QuickBooks Desktop.
What if QuickBooks still cannot save a PDF?
Test Microsoft XPS Document Writer in Notepad, check your Temp folder permissions, and try another QuickBooks form. If those checks pass but PDF creation still fails, the QuickBooks installation may require repair.
Accounts Confidant is an independent accounting and bookkeeping service provider and is not affiliated with Intuit.