Moving QuickBooks Desktop to a new computer can be easier than manually transferring every file and reinstalling the software from scratch. The QuickBooks Desktop Migration Tool is designed to help eligible users move QuickBooks Desktop and supported company files from an old Windows computer to a new one.
If you are searching for a QuickBooks Migration Tool download, QuickBooks migrator tool download, or wondering how to use QuickBooks Migration Tool, it is important to understand how the tool actually works. The Desktop Migrator Tool is accessed through QuickBooks Desktop and uses a USB flash drive to transfer the migration files to the new computer.
This guide explains what the QuickBooks migrator tool transfers, what it leaves behind, how to move your QuickBooks company file to a new computer, and what to do when the QuickBooks Migration Tool is not working, stuck, or not detecting your company file.
Table of Contents
What Is the QuickBooks Desktop Migration Tool?
The QuickBooks Desktop Migration Tool is a feature that helps move a supported QuickBooks Desktop installation from one Windows computer to another. It is intended to reduce the manual work involved in transferring QuickBooks files and setting up the application on a new computer.
Instead of separately locating multiple QuickBooks-related files, the migration process packages supported information and transfers it through a USB flash drive.
The tool can transfer QuickBooks Desktop information along with up to three of the most recently opened company files and certain related files. Some services and configurations, however, require additional setup after the migration.
The QuickBooks data migration tool should therefore not be treated as a complete clone of your old computer. It transfers supported QuickBooks information, but some items still need to be configured manually.
QuickBooks Desktop Migration Tool vs. QuickBooks Online Migration Tool
The terms “QuickBooks Migration Tool” and “QuickBooks Online Migration Tool” can be confusing because they refer to different migration scenarios.
The QuickBooks Desktop Migration Tool is used primarily when you want to move QuickBooks Desktop from one Windows computer to another.
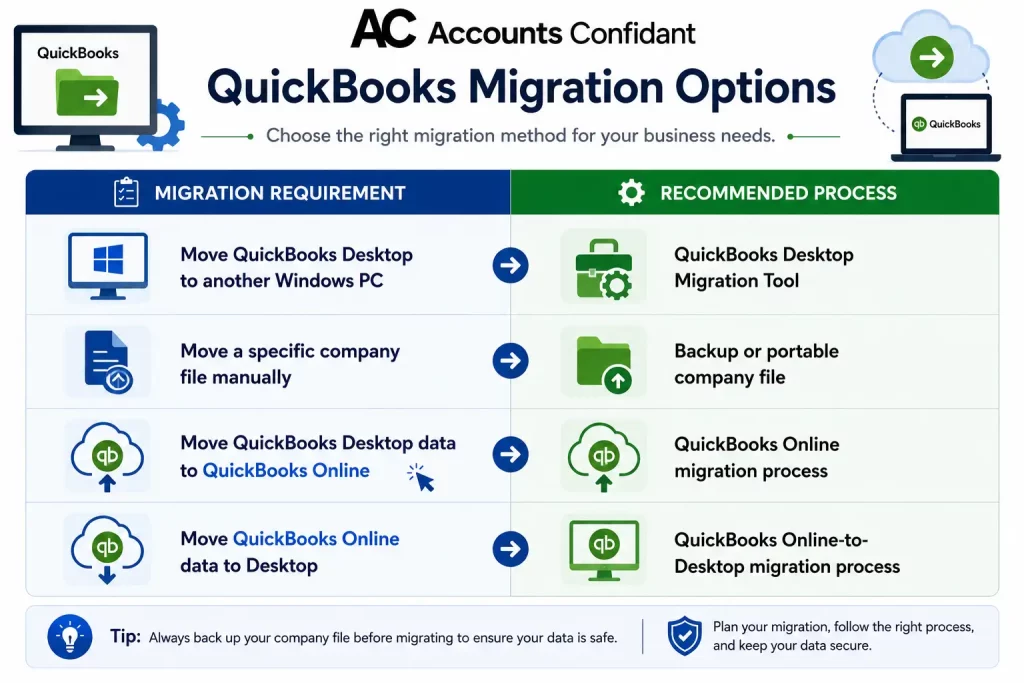
The QuickBooks Online migration tool, meanwhile, is associated with moving accounting data between QuickBooks Desktop and QuickBooks Online.
| Migration requirement | Recommended process |
| Move QuickBooks Desktop to another Windows PC | QuickBooks Desktop Migration Tool |
| Move a specific company file manually | Backup or portable company file |
| Move QuickBooks Desktop data to QuickBooks Online | QuickBooks Online migration process |
| Move QuickBooks Online data to Desktop | QuickBooks Online-to-Desktop migration process |
If your goal is simply to move QuickBooks company file to a new computer, you generally do not need a QBO migration process.
What You Need Before Using the QuickBooks Migration Tool
Before starting the QuickBooks Migration Tool Windows 10/11 process, prepare both computers and the USB drive.
You will generally need:
- A supported QuickBooks Desktop version
- The old Windows computer with QuickBooks installed
- A new Windows computer
- An internet connection on the new computer
- A USB flash drive with enough available space
- QuickBooks login, license, and product information when required
- Administrator access to QuickBooks
- A backup of your company file
The USB drive is used to transfer the migration package from the old computer to the new one. Make sure the drive has sufficient free space before beginning.
Create a Backup Before Migration
Even though the Migrator Tool is designed to transfer supported data, creating a backup before moving your installation is a sensible precaution.
Open your company file on the old computer and create a current backup. Keep that backup separate from the migration USB drive whenever possible.
A backup gives you another recovery option if the migration is interrupted or you discover that a required file was not included.
What Data Does the QuickBooks Migration Tool Transfer?
One of the biggest advantages of the QuickBooks migrator tool is that it can transfer more than just the main company file.
Depending on your QuickBooks version and setup, supported items can include:
- QuickBooks Desktop information needed for installation
- Up to three of the most recently opened company files
- Related company files
- Custom templates and forms
- QuickBooks letters and templates
- Scheduled and memorized reports
- Local attachments
- Printer settings
- Spell-checker settings and custom dictionary information
- Financial Statement Designer data
- Cash Flow Projector data
- Business Planner data
- QuickBooks Loan Manager data
- Statement Writer information for supported QuickBooks Accountant versions
- Advanced reports for supported QuickBooks Enterprise versions
The exact information transferred can vary according to your QuickBooks Desktop edition and configuration.
What Company Files Are Included?
The Migrator Tool does not necessarily move every company file stored on your old computer.
It is designed to transfer up to three of the most recently opened company files. If you have additional files that were not recently opened, you may need to transfer them separately.
This is one reason you should review your company files before beginning the migration.
What Data Does the QuickBooks Migration Tool Not Transfer?
The QuickBooks data migration tool has limitations. Some services, configurations, and files require additional work after migration.
Items that may require separate setup include:
- Multi-user configuration
- Payroll services
- Payment services
- Certain third-party integrations
- Intuit Data Protect configuration
- Additional company files not included in the migration
- Manually created backups
- Some application-specific settings
For example, payroll and payment services may require you to sign in again on the new computer for security and verification purposes.
How to Use QuickBooks Migration Tool
The How to use QuickBooks Migration Tool process involves two computers. You first prepare the migration files on the old computer and then use the USB drive to complete the setup on the new computer.
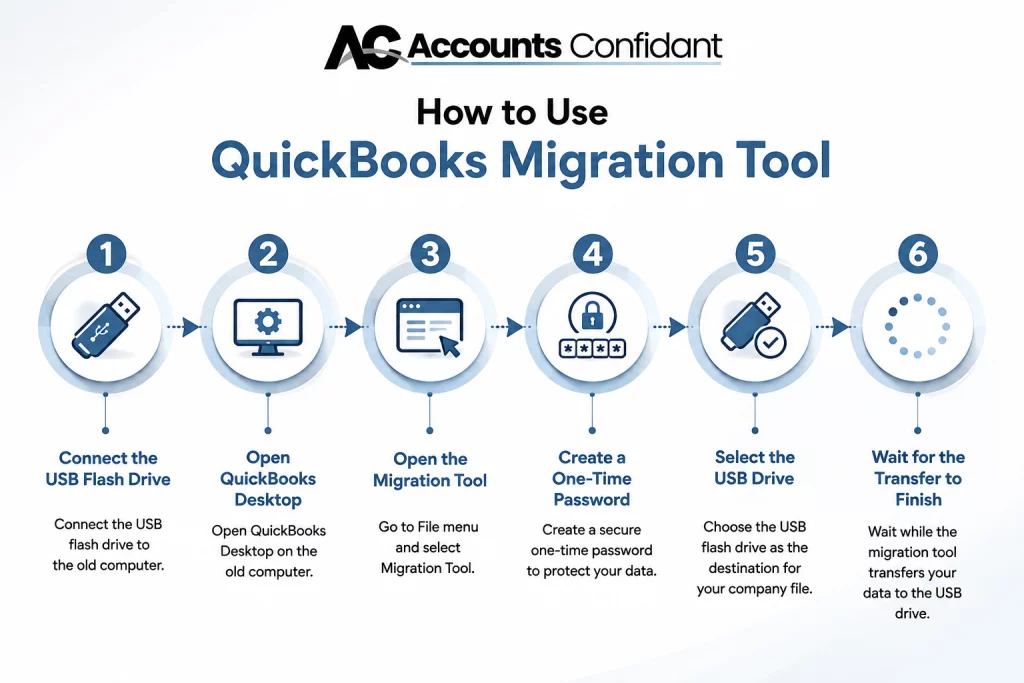
Step 1: Connect the USB Flash Drive to the Old Computer
Insert a USB flash drive into the old computer.
Make sure the drive has enough free space and that Windows recognizes it correctly.
Step 2: Open QuickBooks Desktop
Launch QuickBooks Desktop on the old computer.
Sign in to the company file as the administrator if prompted.
Step 3: Open the Migration Tool
From the QuickBooks Desktop menu, select:
File → Utilities → Move QuickBooks to another computer
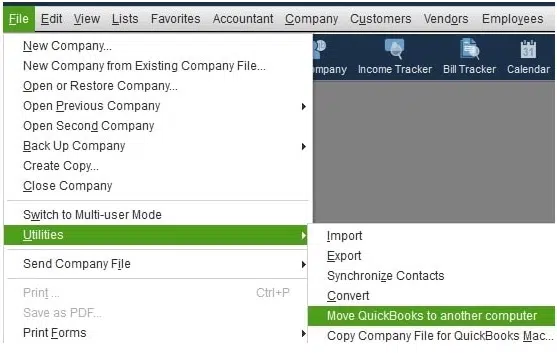
Select I’m Ready to continue.
Step 4: Create a One-Time Password
QuickBooks will ask you to create a one-time password for the migration.
Create a password that you can easily enter on the new computer, but do not share it unnecessarily.
You will need this password when you start the migration on the new computer.
Step 5: Select the USB Drive
Follow the instructions shown by QuickBooks and select the connected USB flash drive.
QuickBooks will prepare the migration files and copy the supported information to the drive.
Do not disconnect the USB drive while the transfer is in progress.
Step 6: Wait for the Transfer to Finish
The transfer time depends on the amount of data being copied and the speed of the computer and USB drive.
Once QuickBooks finishes preparing the migration files, safely remove the USB drive.
Your original QuickBooks installation and company files remain on the old computer.
How to Complete the Migration on the New Computer
After preparing the migration package, you can move to the new Windows computer.
Step 1: Connect the USB Drive
Insert the USB flash drive into the new computer.
Wait for Windows to recognize the drive.
Step 2: Open the Migration Files
The migration process may not start automatically.
Open the USB drive and locate the Move_QuickBooks.bat file.
Double-click the file to launch the migration process.
Step 3: Enter the One-Time Password
Enter the one-time password you created on the old computer.
Follow the instructions displayed by QuickBooks.
Step 4: Allow QuickBooks to Complete the Setup
The migration process will install or set up the supported QuickBooks Desktop information and transfer the eligible files.
Do not turn off the computer or disconnect the USB drive while the process is running.
Step 5: Open QuickBooks on the New Computer
After the migration finishes, launch QuickBooks Desktop.
Open the transferred company file and verify that your accounting information is available.
What to Do After QuickBooks Migration
Finishing the migration does not necessarily mean every QuickBooks service is ready to use.
Complete these checks after moving QuickBooks:
Sign In to Payroll and Payment Services
If you use QuickBooks payroll or payment services, sign in again if prompted.
Verify that the services are connected and working correctly.
Reconfigure Backup Services
If you use Intuit Data Protect or another backup service, sign in and verify your backup settings.
Make sure the correct company files are included in your backup schedule.
Check Additional Company Files
If you have more than three company files, locate the remaining files and transfer or restore them separately.
Do not assume that every .QBW file on the old computer was automatically included.
Test Reports and Templates
Open important reports and verify custom templates, forms, attachments, and other frequently used resources.
Create a New Backup
Once the migration is complete and your company file opens correctly, create a fresh backup on the new computer.
QuickBooks Migration Tool vs. Manual Transfer
You can also move QuickBooks company file to new computer manually. However, manual transfer involves more individual steps.
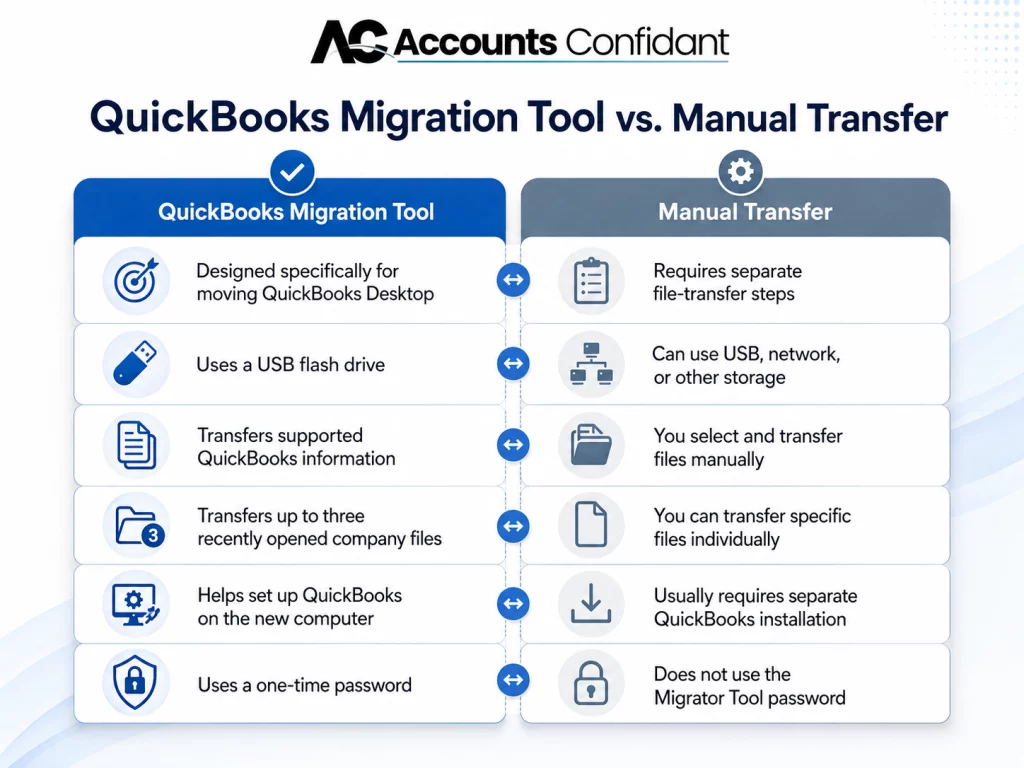
| QuickBooks Migration Tool | Manual Transfer |
| Designed specifically for moving QuickBooks Desktop | Requires separate file-transfer steps |
| Uses a USB flash drive | Can use USB, network, or other storage |
| Transfers supported QuickBooks information | You select and transfer files manually |
| Transfers up to three recently opened company files | You can transfer specific files individually |
| Helps set up QuickBooks on the new computer | Usually requires separate QuickBooks installation |
| Uses a one-time password | Does not use the Migrator Tool password |
Manual transfer can make sense if you only need to move a specific company file or if the Migrator Tool does not support your particular setup.
How to Move a QuickBooks Company File Manually
If you need to transfer a company file separately, you can use a QuickBooks backup or portable company file.
A typical manual process is:
- Open QuickBooks on the old computer.
- Create a current backup of the company file.
- Store the backup on an external drive or another secure location.
- Install the appropriate QuickBooks Desktop version on the new computer.
- Transfer the backup to the new computer.
- Open QuickBooks.
- Restore the backup.
- Verify that the company file opens correctly.
Do not simply delete QuickBooks from the old computer immediately after transferring your data. Keep the original installation and files available until you have confirmed that the new computer is working correctly.
QuickBooks Migration Tool Not Working? Try These Fixes
If the QuickBooks Migration Tool not working problem occurs, start with the basic requirements before attempting more complicated troubleshooting.
Check the USB Drive
Make sure the USB drive:
- Is properly connected
- Has sufficient free space
- Appears correctly in Windows File Explorer
- Is not disconnecting during the transfer
If the drive appears unreliable, try another USB flash drive.
Check the Internet Connection
The new computer needs an internet connection during the migration process.
Verify that the connection is stable before starting the transfer.
Check Windows Compatibility
Make sure the new computer meets the supported Windows requirements for your QuickBooks version.
If you are moving a 64-bit QuickBooks installation, also verify that the new computer uses a compatible 64-bit Windows environment.
Run the Migration File Manually
If the migration process does not start automatically, open the USB drive and double-click:
Move_QuickBooks.bat
This can help when Windows does not automatically launch the migration process.
Check Available Storage
Insufficient storage on the new computer or USB drive can interrupt the migration.
Delete unnecessary files or use a drive with more available space if required.
Restart the Computers
If the migration process fails unexpectedly, restart both computers and try again after checking the USB connection and internet access.
QuickBooks Migration Tool Stuck During Transfer
If the QuickBooks Migration Tool stuck issue occurs, avoid immediately disconnecting the USB drive.
First check:
- Whether the USB drive is still connected.
- Whether Windows recognizes the USB drive.
- Whether the new computer has sufficient storage.
- Whether the internet connection is active.
- Whether QuickBooks is still responding.
- Whether the computers meet the required system specifications.
If the process remains unresponsive, restart the migration only after ensuring that your original company files and backup are safe.
QuickBooks Migration Tool Not Detecting Company File
The QuickBooks Migration Tool not detecting company file issue can occur when the required file is not among the files selected for migration.
Remember that the Migrator Tool is designed to transfer up to three recently opened company files.
If the company file you need is missing:
- Open the file on the old computer.
- Confirm that you are working with the correct company file.
- Create a current backup.
- Transfer the file separately if necessary.
- Restore or open the file on the new computer.
- Verify the company data after transfer.
This approach is particularly useful when you have several company files stored on the old computer.
Can You Use QuickBooks Migration Tool on a Mac?
The QuickBooks Desktop Migration Tool is designed for supported Windows-to-Windows transfers.
It should not be treated as a direct Windows-to-Mac migration solution.
If you are moving from a Windows computer to a Mac, the process involves QuickBooks Desktop for Mac and the appropriate company-file conversion or restoration method.
Before transferring the file, verify that the QuickBooks Desktop versions and file formats are compatible.
QuickBooks Migration Tool Windows 10/11 Compatibility
Windows compatibility should be checked before beginning a migration.
If you are moving QuickBooks to a computer running Windows 10 or Windows 11, verify that your particular QuickBooks Desktop version supports the operating system.
You should also check:
- Windows version
- 32-bit or 64-bit architecture
- Available disk space
- Internet connectivity
- QuickBooks Desktop version
- Company-file compatibility
Migrating to a new computer is a good opportunity to confirm that your QuickBooks version is compatible with the new environment before transferring your accounting data.
QuickBooks Migration Tool Best Practices
A few precautions can make the migration considerably smoother:
- Create a backup before beginning.
- Keep the old computer available until migration is verified.
- Use a reliable USB flash drive.
- Check available storage before starting.
- Keep both computers connected to power.
- Maintain an active internet connection on the new computer.
- Keep your QuickBooks license information available.
- Verify all company files after migration.
- Sign back into payroll and payment services when required.
- Reconfigure backup services.
- Test important reports and forms.
- Create a fresh backup after completing the migration.
Final Thoughts
The QuickBooks Desktop Migration Tool provides a convenient way to move a supported QuickBooks Desktop installation from an old Windows computer to a new one without manually transferring every supported QuickBooks component.
However, migration is not simply a matter of copying one company file. The tool has specific limitations, including the number of recently opened company files it transfers and the QuickBooks services that may require additional setup.
Before starting, create a backup, check your Windows and QuickBooks compatibility, prepare your USB flash drive, and keep your original computer available until you have verified the new installation.
If the QuickBooks Migration Tool is not working, gets stuck, or does not detect the company file you need, check the USB drive, storage, internet connection, Windows compatibility, and the files included in the migration. For company files that are not included, a separate backup or manual transfer may be the better option.
Frequently Asked Questions
What does the QuickBooks Migration Tool actually transfer?
The tool can transfer QuickBooks Desktop information, up to three recently opened company files, and supported related files such as templates, forms, reports, attachments, and certain QuickBooks-specific settings. Some services and configurations require additional setup after migration.
How do I move my QuickBooks company file to a new computer?
Open QuickBooks Desktop on the old computer and select File → Utilities → Move QuickBooks to another computer. Create a one-time password, connect a USB flash drive, and follow the migration instructions. On the new computer, open the USB drive, run Move_QuickBooks.bat, enter the password, and complete the setup.
Do I need a USB drive to use the QuickBooks Migration Tool?
Yes. The Desktop Migrator Tool uses a USB flash drive to transfer the migration package from the old computer to the new computer.
Does the QuickBooks Migration Tool move my license and product info?
The migration process helps set up QuickBooks on the new computer, but you should keep your license and product information available because activation or registration may be required.
Is the QuickBooks Migration Tool the same as reinstalling QuickBooks?
No. Reinstalling QuickBooks involves installing the application separately on the new computer. The Migrator Tool is designed specifically to simplify the process of moving QuickBooks Desktop and supported data between computers.
QuickBooks Migration Tool is stuck, what do I do?
Check the USB connection, available storage, internet connection, Windows compatibility, and whether the migration process is still responding. If the migration file does not launch automatically, open the USB drive and run Move_QuickBooks.bat manually.
Can I use the Migration Tool to move QuickBooks to a Mac?
The Desktop Migration Tool is intended for supported Windows-to-Windows transfers. Moving from Windows to Mac requires the appropriate QuickBooks Desktop for Mac conversion or restoration process.
Does the Migration Tool transfer payroll and add-on data?
Some QuickBooks-related information may transfer, but payroll, payment services, third-party integrations, and other connected applications may require additional sign-in, installation, or configuration on the new computer.
How long does QuickBooks Migration Tool take to complete?
The migration time varies based on company file size, USB speed, computer performance, internet connection, and the amount of data being transferred. There is no fixed completion time that applies to every migration.
What’s the difference between Migration Tool and manually copying the company file?
The Migration Tool is designed to move supported QuickBooks Desktop information and company files while helping set up the application on the new computer. Manual transfer requires you to install QuickBooks separately and transfer or restore the required company files yourself.
Where can I find the QuickBooks Migration Tool?
For the Desktop-to-Desktop process, open QuickBooks Desktop and go to File → Utilities → Move QuickBooks to another computer. The Migrator Tool is accessed from within supported QuickBooks Desktop installations rather than being a generic standalone download.
What should I do after migrating QuickBooks Desktop?
Open the company file on the new computer and verify your data. Then sign in to payroll and payment services, reconnect required integrations, configure backup services, transfer any additional company files, and create a new backup.
What if my company file is not detected by the Migration Tool?
The Migrator Tool transfers up to three recently opened company files. If the required file is not included, open the company file on the old computer and create a backup or use another supported transfer method to move it separately.