Installing QuickBooks Desktop is the first step toward managing your company’s accounting, payroll, expenses, and financial records from one place. Whether you are setting up the software for the first time, moving it to another computer, or preparing a multi-user environment, following the right QuickBooks Desktop install process can help prevent setup and access issues later.
This guide explains how to download QuickBooks Desktop, choose the appropriate installation option, and complete the setup on Windows. We’ll also cover how to install QuickBooks Desktop on a new computer, reinstall the software after replacing a device, and set it up for multiple users or a remote server environment.
Before installing QuickBooks Desktop, however, it is important to make sure your computer, installation files, and company data are ready.
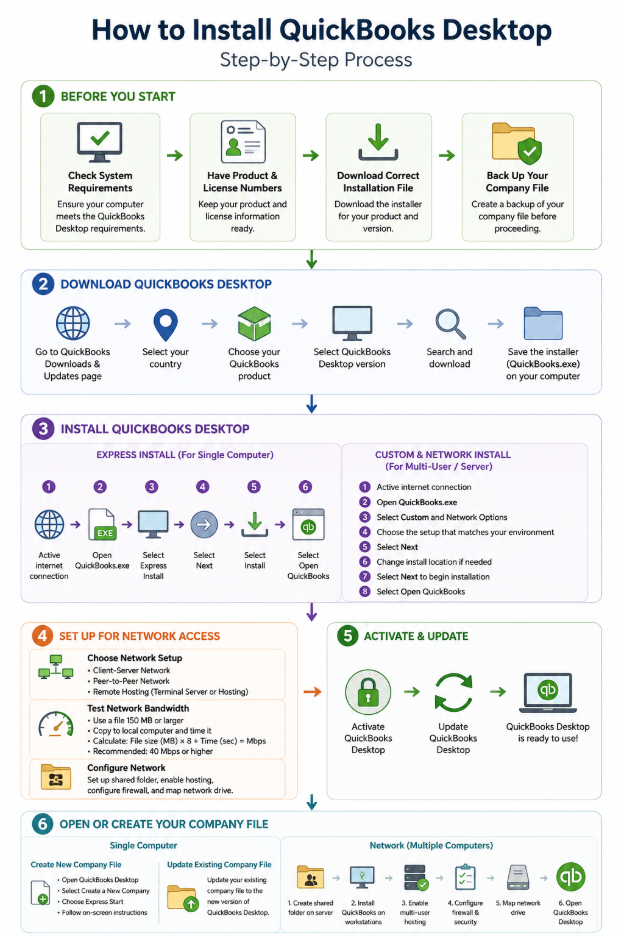
Table of Contents
What to Do Before Installing QuickBooks Desktop
Before you begin installing QuickBooks Desktop, take a few minutes to prepare your computer and gather the information you need. This can help you avoid installation interruptions and make the setup process smoother.
Check Your System Requirements
First, make sure your computer meets the requirements for the version of QuickBooks Desktop you plan to install. Requirements can vary by version. For example, QuickBooks Desktop 2024 requires a 64-bit Windows operating system and supports Windows 11 when installed natively. Intuit also lists specific processor, RAM, storage, and server requirements.
Have Your Product and License Numbers Ready
You will need your QuickBooks product and license information during the installation process. You can typically find these details in your Intuit account, purchase confirmation email, original product packaging, or through Intuit’s license lookup options.
Download the Correct Installation File
Before you start the QuickBooks Desktop install, make sure you download the installer for the correct product and version. Intuit provides downloads based on your country, product, and QuickBooks Desktop version.
Back Up Your Company File
If you are upgrading QuickBooks, reinstalling the software, or moving to another computer, create a backup of your company file before making changes. This gives you a copy of your accounting data that can be restored if needed. Intuit also recommends backing up your data before upgrading or moving your books.
Once you have checked these requirements, you can move on to how to download QuickBooks Desktop and begin the installation process.
How to Download QuickBooks Desktop
Before you can start installing QuickBooks Desktop, you need the correct installation file for your QuickBooks product and version.
Steps to Download QuickBooks Desktop
- Go to the QuickBooks Downloads & Updates page.
- Select your country.
- Choose your QuickBooks product.
- Select the QuickBooks Desktop version you want to install.
- Select Search or the available download option.
- Download the installation file to your computer.
- Save the file somewhere easy to find, such as your Windows desktop or Downloads folder.
If you have a QuickBooks Desktop subscription, you can also sign in to the Customer Account Management Portal (CAMPs), locate your registered QuickBooks product under Products & Services, select Details, and choose Download.
Once the download is complete, locate the QuickBooks.exe file. You will use this file to begin the QuickBooks Desktop install process. It is required to have an active internet connection and your product and license numbers before starting.
How to Install QuickBooks Desktop on Windows 11
Once QuickBooks Desktop is downloaded, you can begin the installation using the QuickBooks.exe file. The installation wizard provides two main options: Express Install and Custom and Network Options. Choose the one that matches how you plan to use QuickBooks Desktop.
Choose Your Installation Type
Express Install is designed for a standalone computer. It saves your preferences and installs over your previous QuickBooks version.
Custom and Network Options is designed for multi-user, multi-computer, or server-based setups. It allows you to choose a different installation location, keep previous QuickBooks versions, and configure network sharing.
Express Install
Use Express Install when you are installing QuickBooks Desktop on one computer or reinstalling it on a single computer.
- Make sure you have an active internet connection.
- Open QuickBooks.exe.
- Select Express Install.
- Select Next.
- Select Install.
- When the installation finishes, select Open QuickBooks.
If you are installing QuickBooks Desktop for the first time, you may be prompted to restart your computer.
Custom and Network Install
Use Custom and Network Options when QuickBooks Desktop will be used across multiple computers or when a server will host your company files.
- Make sure you have an active internet connection.
- Open QuickBooks.exe.
- Select Custom and Network Options, then select Next.
- Choose the option that matches your setup:
- I’ll be using QuickBooks Desktop on this computer: Choose this for a workstation.
- I’ll be using QuickBooks Desktop on this computer AND I’ll be storing our company file here so it can be shared over our network: Choose this when the computer will run QuickBooks and store the company files. This is also the option for a Terminal Server.
- I will NOT be using QuickBooks on this computer. I will be storing our company file here so it can be shared over our network: Choose this when the computer will only store the company files and use QuickBooks Database Server Manager.
- Select Next.
- If required, select Change the install location and use Browse to choose another folder.
- Select Next to begin the installation.
- When installation finishes, select Open QuickBooks.
After you install QuickBooks Desktop, the software will ask you to activate and update QuickBooks. If you need help updating the software, follow our guide on how to update QuickBooks Desktop for manual and automatic update methods.
How to Set Up QuickBooks Desktop for Network Access
If you are setting up QuickBooks Desktop for multiple computers, you need to configure network sharing after installation.
QuickBooks Desktop supports several network arrangements, including client-server and peer-to-peer networks.
Client-Server Network
In a client-server network, a central server stores the company files. QuickBooks Desktop is installed on each workstation, allowing users to access the company files through the network.
Peer-to-Peer Network
A peer-to-peer network does not use a dedicated server. QuickBooks Database Server Manager and QuickBooks Desktop are installed on one workstation so it can share the company file with other workstations.
Remote Hosting Services
QuickBooks Desktop can also be used through remote hosting arrangements.
A local terminal server hosts QuickBooks Desktop and the company files on a central server. Users connect remotely to run QuickBooks Desktop, so they do not need QuickBooks installed on their individual workstations.
QuickBooks Desktop with Hosting is another option.
Test Network Bandwidth
For a network installation, you need a 40 Mbps or higher bandwidth.
To test the bandwidth:
- Find a data file that is 150 MB or larger.
- Copy the file from the shared folder to the computer.
- Record the time required for the transfer.
- Calculate the bandwidth using:
File size in MB × 8 ÷ copy time in seconds = Mbps
For example:
150 MB × 8 ÷ 25 seconds = 48 Mbps
Activate and Update QuickBooks Desktop
After you install QuickBooks Desktop, the software will ask you to activate and update QuickBooks.
Select Open QuickBooks after installation and follow the activation instructions displayed by the software. If this is your first installation, restart the computer if QuickBooks prompts you to do so.
Once activation and updating are complete, you can move on to working with your company file.
How to Open or Create Your Company File
After installing QuickBooks Desktop, you can create a new company file or work with an existing one.
Create a New Company File on a Single Computer
If you are using QuickBooks Desktop on one computer without a network:
- Open QuickBooks Desktop.
- Select Create A New Company, or go to File and select New Company.
- Select Express Start.
- Follow the on-screen instructions.
Update an Existing Company File
If you already have a company file, you can update it to a new version of QuickBooks Desktop using the appropriate company-file update process.
Set Up Company Files on a Network
If QuickBooks displays a company-file or network error while opening the shared file, see our guide to the QuickBooks Error 6000 Series.
Else, QuickBooks Desktop is being used across multiple computers:
- Create a shared folder on the server for your company files.
- Install QuickBooks Desktop on the workstations.
- Turn on multi-user hosting on the server.
- Start QuickBooks Desktop on the server.
- Go to File, then select Utilities.
- Make sure Stop Hosting Multi-User Access appears. This means hosting is turned on.
- If you installed only QuickBooks Database Server Manager, scan your company files.
- Configure firewall and internet security settings.
- Map a network drive to the shared folder on the server.
- Open QuickBooks Desktop.
Administrator rights are required on the server and workstations to create shared folders.
How to Install QuickBooks Desktop on a New Computer
If you need to how to install QuickBooks Desktop on new computer, Intuit provides a Migrator Tool for users who need to move or reinstall QuickBooks Desktop on another computer.
Before moving your books, back up your data. If you are upgrading or moving your QuickBooks Desktop setup, keeping a backup provides a copy of your data before the move.
For a new computer, install or move QuickBooks Desktop using the appropriate process for your situation, then work with your company file in the new installation.
How to Install QuickBooks on a Remote Desktop Server
If you need to install QuickBooks on remote desktop server, QuickBooks Desktop provides a server installation option through Custom and Network Options.
When selecting the installation setup, choose:
“I’ll be using QuickBooks Desktop on this computer AND I’ll be storing our company file here so it can be shared over our network.”
Intuit identifies this configuration as the option for a Terminal Server.
With a local terminal server, QuickBooks Desktop and the company files are hosted on a central server. Users can connect remotely to run QuickBooks Desktop without having the software installed on their individual workstations.
Conclusion
The correct QuickBooks Desktop install option depends on how you plan to use the software. Express Install is intended for a standalone computer, while Custom and Network Options provides the configurations needed for workstations, servers, and network environments.
Before installing QuickBooks Desktop, download the appropriate version, have your product and license information ready, and back up your data if you are upgrading or moving your books. Once installation is complete, activate and update QuickBooks and then create, open, or update your company file.
Before finalizing your multi-user or server setup, review Intuit’s official recommendations for networks supported by QuickBooks Desktop
Frequently Asked Questions
How do I install QuickBooks Desktop step by step on Windows 11?
Open the downloaded QuickBooks.exe file, follow the installation wizard, accept the license agreement, enter your product and license numbers, and select the appropriate installation type. For a standalone computer, select Express Install. For a network or server setup, select Custom and Network Options.
What are the requirements before installing QuickBooks Desktop?
Before installing QuickBooks Desktop, download the appropriate product and version, have your product and license numbers ready, and check the system requirements for your version. If you are upgrading or moving your books, back up your data before installation.
How can I install QuickBooks Desktop on a new computer without losing my company files?
If you are moving QuickBooks Desktop to another computer, Intuit provides a Migrator Tool for this purpose. If you are upgrading or moving your books, create a backup of your data before beginning the move.
Why is my QuickBooks Desktop installation failing and how do I fix it?
Make sure you have an active internet connection and the correct QuickBooks.exe installation file. If the problem continues, use QuickBooks Tool Hub to access troubleshooting utilities such as Quick Fix My Program and the QuickBooks Install Diagnostic Tool.
How do I reinstall QuickBooks Desktop after replacing my computer?
Download the appropriate QuickBooks Desktop installation file on the replacement computer and follow the installation process. If you are moving QuickBooks Desktop from another computer, use the appropriate Migrator Tool instructions provided by Intuit.
How do I install QuickBooks Desktop for multiple users on a network?
Choose custom and network options during installation and select the option that matches your network setup. After installation, configure the shared company-file folder, multi-user hosting, firewall and security settings, and network drive.
Can I install QuickBooks Desktop on a server and access it remotely?
Yes. QuickBooks Desktop can be installed on a Terminal Server. During the Custom and Network installation, select the option to use QuickBooks Desktop on the computer and store the company file there so it can be shared over the network.
How do I activate QuickBooks Desktop after installation?
After installation, select Open QuickBooks and follow the activation instructions. Select Begin Activation and complete the prompts shown in QuickBooks.
What is the difference between Express Install and Custom Network Install in QuickBooks Desktop?
Express Install is intended for a standalone computer. Custom and Network Options is designed for multi-user, multi-computer, and server-based setups and provides options for network sharing and installation locations.
Should I install QuickBooks Desktop locally or use QuickBooks cloud hosting?
QuickBooks Desktop supports local installations, client-server networks, peer-to-peer networks, local terminal servers, and hosted environments. The appropriate option depends on how your QuickBooks Desktop installation and company files need to be accessed.